
BarCode Labels using Avery Labels -
This technique requires Abacus 21 BarCode Font Drivers... and a LaserJet or InkJet Printer.
This setup is found by quick jump to IN5, Daily Transactions, Non-PO Receiving Control (for instance):
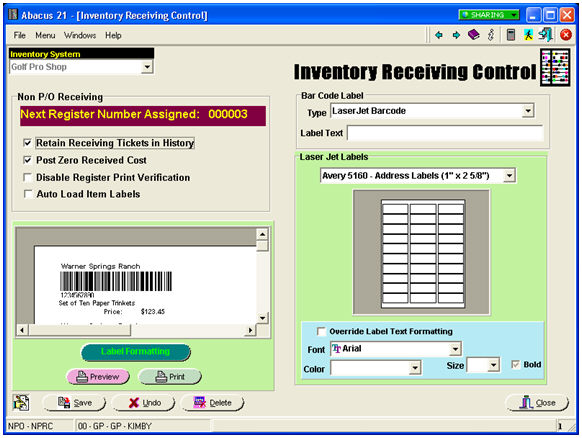
Select Inventory System
BarCode Label Type: Select LaserJet Barcode
Select the size labels you will be using
Select Label Formatting -- which is where you can change the Name or Position or any other text that defaults on label
After you load your labels, you can select the 'PRINT' button to confirm your labels line up for the size you are using... and this prints a label test page.
When you print labels from Non-PO Receiving, regular Receiving, or from the standalone label printing program, make sure you load Avery labels and select the appropriate Laser printer when the Windows Printer box appears.
This creates INVLABEL.RTM (on this PC only) and it will save the label text.
If more than one PC will print labels, then it is necessary to copy this to the Fix-folder on the Server or save the label after you format it again on that (other) PC.
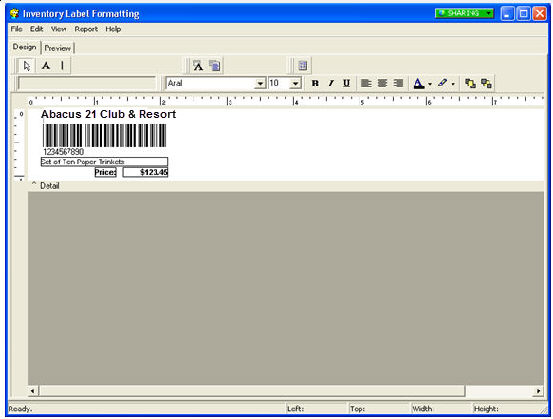
Below is a screenshot of the Label formatting program. Here you can make any changes to the Avery label format -- cosmetically determining the format. You can move boxes around, change text, or eliminate that information if not needed. (This is the default setting that appears the first time you run this.)
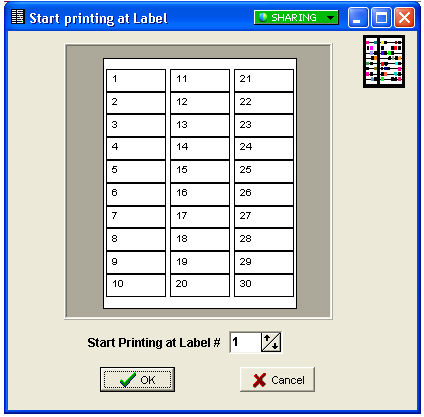
The Screenshot below is spawned when you press the 'PREVIEW' button... and will open a window that shows the label layout for the size of the Avery Label that you selected.
Batch Printing of Labels -
Quick-Jump to NPO.
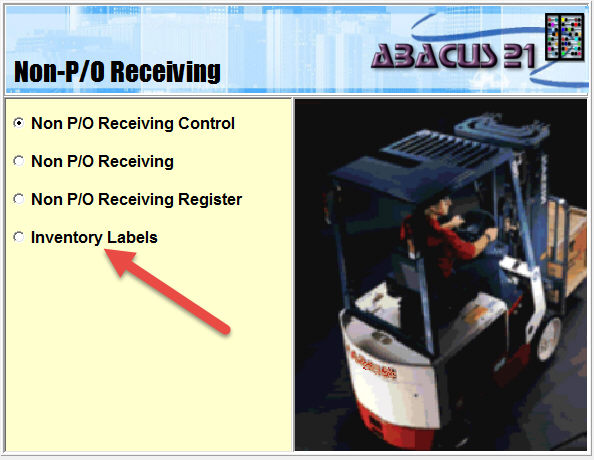
Select Inventory Labels.

Select Inventory System and Outlet from drop-down box.
Select the tab called SELECT.
Select and highlight the LOCATION, ITEM TYPES and ITEM GROUPS for which you want labels.
You can select individual or multiple selections by highlighting what is in the lists.
You also have another option on that screen on the right-hand side if you want to select a series of Items. You can un-check All Items and enter a Starting and Ending Item-Code.
Once you decide what way you want to create labels, in the middle of the screen is a box that says SELECT ITEMS WITHIN SELECTION CRITERIA... and press that on screen button. This will generate the Labels for whatever way you decided.
When you are ready to print the labels press the GENERATE AND PRINT LABELS button on the screen. Prior to pressing this button.
If you need more than one label for an Item on the list on the screen... you can highlight any item line and press the edit button and change the Quantity.
Also if there is an Item in that list that you don't want a label for, you can highlight the line and press the DELETE button that is next to the ADD and EDIT button.
You can make any changes to the list of Item labels you have just created prior to pressing GENERATE AND PRINT LABELS.