
This module exports Abacus Point-of-Sale Item-Sales to Food-Trak.
Setup Requirements -
Food-Trak Profit Center:
A Food-Trak Profit Center equates to an Abacus Section.
Food-Trak requires the Profit Center Prefix be a numeric value. So, if the Section-Code is not numeric, it will be necessary to map from an Abacus Section-Code to a Food-Trak Profit Center Prefix.
There is no real appropriate place to do this, so this program uses the FAX field from the Section Setup to carry the Food-Trak Profit Center Prefix.
If a value is found in the FAX field, this will be exported in place of the Section-Code.
If the Section-Code is already a numeric value, the FAX field may be left blank and the Section-Code itself will be exported.
Note: Also, since (in Abacus) Section-Codes do not have to be unique across Outlets -- even if the Section-Codes are numeric -- the FAX field will still have to be used to uniquely identify the Section as a different Food-Trak Profit Center.
Note: Although this field accepts alpha characters, it is the User’s responsibility to only enter a valid numeric value in this field.

Food-Trak PLU Codes -
A Food-Trak PLU Code equates to an Abacus Item Code.
As a prerequisite, the Items must be separately defined in the Food-Trak system prior to importing Abacus Sales information.
As with the Profit Center, the Food-Trak PLU Code requires a numeric value. So again you must map from an Abacus Item Code to a Food-Trak PLU Code.
In this case however we have User-Defined fields in Item Maintenance that can very conveniently be used for this purpose.
The Food-Trak Export program is set up to use User-Defined String-Field-1 for this purpose. So the label for this field can be set in Inventory System Setup with an appropriate label:
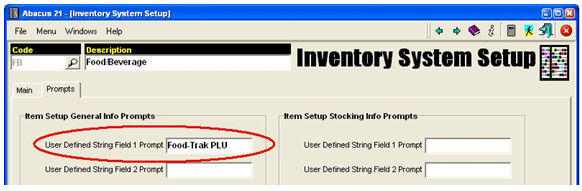
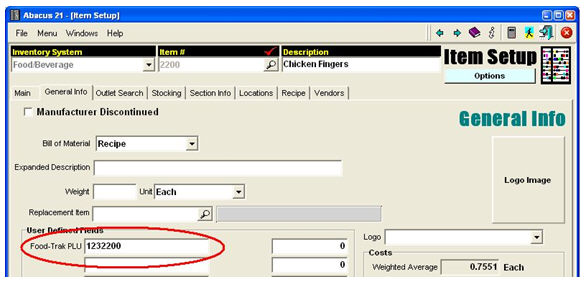
Then, in Item-Maintenance, the corresponding Food-Trak PLU Code can be assigned to each Item that is to be exported to Food-Trak.
Since only selected items may be desired for export to Food-Trak, the Export program also uses the existence of a value in this field to identify Items to be exported. So... even if the Abacus Item Code matches the Food-Trak PLU Code, it is still necessary to enter the PLU Code in this field.
Note – although this field accepts alpha characters, it is the User’s responsibility to only enter a valid numeric value in this field.
Program Operation -
This program only exports Sales that have been posted through the POS Register (ie, that are in History). So normally you will not run this until all the POS Registers have been processed for the Date(s) in question.
The Export program can be run on demand from the POS Daily Close Menu – Option “Daily Sales Export to 3rd-Party”.
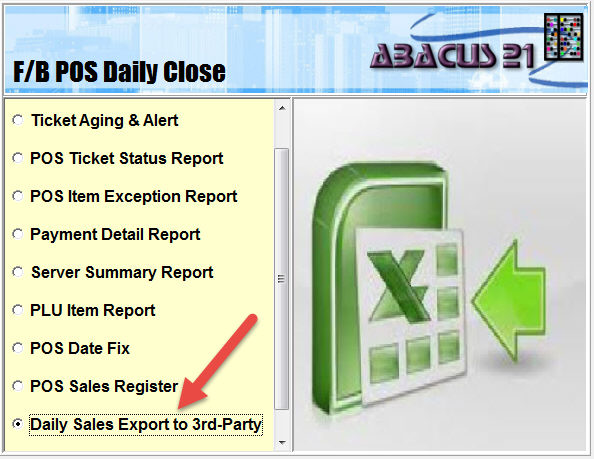
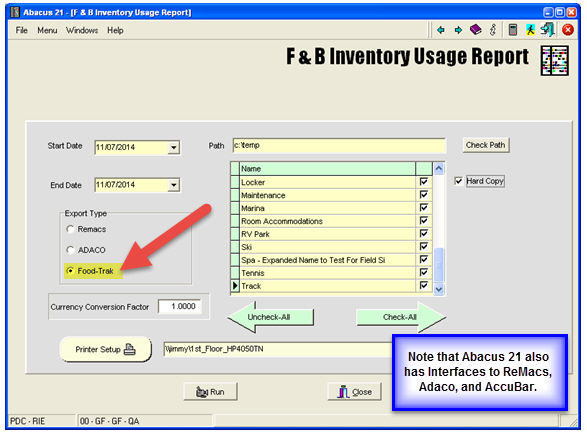
The program can also export Sales information in formats for ReMacs and Adaco and AccuBar (call Abacus 21 Sales if interested) – so be sure to select the “Food-Trak” Export Type.
If on the Food-Trak side you wish to see Sales specifically by Day, then it is necessary to run this program individually for each day.
The specifications from Food-Trak do not allow for multiple Dates to be individually identified within a single export. So normally this program will be run for a single Date – and both the Start and End dates will be set to the same date.
If for some reason you wish to export multiple Dates in one Batch, you can do so... but the Sales for the entire Date range will be reflected as the entered Start Date.
There is also an option to see a hard-copy report of the information being exported. On this report, the Abacus Section-Code is displayed rather than the Food-Trak Profit Center Prefix. If you want this report produced, check the “Hard-Copy” button to the right.
Identify the output path. The program will create the output file in this location with the name Food-Trak-YYYYMMDD.csv – where YYYYMMDD is the start date selected.
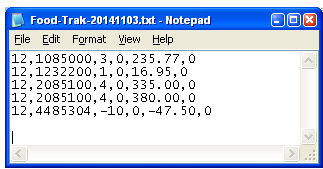
The Export file will look like this (using Abacus test data):
The corresponding report will look like this:

Importing into Food-Trak is the responsibility of the Client (with assistance from their Food-Trak Vendor). However, the procedure is outlined in the Food-Trak POS Interface specification.
The original Food-Trak™ Specification (from 06/13/2014) is included below for reference:
Using the Generic Profit Center POS Interface -
Configuring POS Prefix codes in FOOD-TRAK ® database
A POS Profit Center Prefix identifies a profit center based on a code that is used in conjunction with the PLU code
to identify the product. This allows 2 similar products to have the same base code (i.e. 8800) and the prefix code
actually specify the profit center.
For example,
The ‘Steak Plate’ in the restaurant can have a PLU code of 8800, and the Restaurant POS Prefix Code 12.
The ‘Steak Plate – Bar’ in the bar can have a PLU code of 8800, and the Bar POS Prefix Code of 29.
Now when the data is imported, the POS prefix is used to identify the profit center, and the PLU code is used to
identify the product within that profit center.
The Profit Center POS Prefix codes are entered via the “Profit Center POS Prefix” function located on the General
tab of the Administration menu. When launched, this function presents a dialog that allows you to switch between
those POS interfaces that support the Profit Center POS Prefix functionality. After selecting the interface you can
assign a Prefix Code to each of the listed Profit Centers. Press “OK” to save your changes when you are finished.
Configuring PLU codes in FOOD-TRAK ® database -
Before POS data can be imported into FOOD-TRAK®, all the items being imported from your POS system must
have an item in the FOOD-TRAK® database with a matching PLU code. This code is entered on the sales tab of the
item editor.
Scheduling a POS import -
When you import data from your POS, FOOD-TRAK® will create a new sales entry which can then be viewed,
edited, and used in reports just like sales that are entered manually. Below are the steps for a POS import:
From the Control Console, click Data Entry
Select the Sales Tab
Select the POS system from which you will be importing.
The POS import wizard will be displayed and ask a series of questions relevant to your particular POS system (see Remarks below).
After answering all the questions, click the Submit button.
The scheduling screen will be displayed and you may choose to execute the import immediately, or schedule the import for later execution or recurring execution.
The import will execute at the time you specify. When it is complete, a message will be placed on the
FOOD-TRAK® Alert List. The message will include information about when the import occurred and about each line item that attempted to import. Items that do not have a properly matching PLU code will have a “not found” notation following the PLU code in the message.
Remarks:
The scheduling wizard will prompt for the following information:
Import Filename: This is the file created by your POS system and must be created before the FOOD-TRAK® import process is executed. Typically there is an export function in your POS system that generates a file which is saved in a location determined by the POS system. When scheduling an import, enter the full path and filename in the space provided, or use the mouse to search the drives and directories on your system. (See Information Sheet for details)
Specify Sales Date Range: These dates tell FOOD-TRAK® what period of time the imported sales records represent. You may enter specific dates and times or use the Relative Date feature. The Relative Date feature is useful for recurring scheduled imports where the Sales Date Range will vary with each import execution. In the Relative Date dropdown list, you may select Today, Yesterday, This Week, Last Week, etc. These dates are determined at the time the import begins to execute. For example, if Monday’s sales are exported by your system Monday night, you may want to schedule an import to execute Tuesday morning and specify the Sales Date Range as “Yesterday” – or alternatively, schedule the job for late Monday night and specify the Sales Date Range as “Today”. Either way, the system would interpret the import as representing Monday’s sales.
Price Import Options: There are two options that you use to indicate how you would like FOOD-TRAK® to handle the prices of the items being imported. Select “Use prices from import file” if you would like your FOODTRAK ® sales records to show the prices as they appear in your import file. If you would like FOOD-TRAK® to ignore the prices provided by your POS system and only use the prices you’ve set up in the Item Editor, then select “Use prices from FOOD-TRAK® database”. If you choose the first selection (to use the imported prices), you then may also choose (by checking the box) to update the prices in the FOOD-TRAK database with the prices encountered while importing.
POS Information Sheet -
Name : Generic Dealer Demo
Company: System Concepts, Inc.
Record Type:
ASCII - Comma-Separated Fields
Sample Record:
12,1,4,0,4.80,0.00
^ ^ ^ ^ ^ ^
1 2 3 4 5 6
Field # Description Start Length Comments:
POS Prefix 2 Unsigned Integer - identifies the profit center. If this is blank, then just the PLU code is used to identify the product.
Plu Codes 12 Unsigned Integer
Quantity 5 Signed Integer
Return Quantity 5 Signed Integer (not used)
Total Sales Value 10 Explicit Decimal
Discount 8 Decimal ( not used)
How to Enter the POS Code -
POS codes are integer numbers with a maximum length of 12 digits.