
This document provides the setups necessary for using the Micros (batch) Point-of-Sale (Member-related Charges) Import into System 441 Point-of-Sale.
Please check with Micros for Software & Setups required on the Micros-side of the Interface.
Other Abacus 21 setups may be required.
This Interface can be set up to accomplish several purposes:
Pass Member-related Charges from Micros POS to Abacus Member-Receivables
Pass Member-related Micros POS Ticket Information (including Items) to Abacus Member Sales History and A/R History -- thus facilitating normal Member-related functionality such as F/B Minimums.
Pass POS Item Sales thru Abacus Recipes and associated Inventory-Depletion processes.
Build Abacus-side Journal Entries (for all of the above).
All of this (and more) is accomplished by processing a Micros-originated (batch) Import file through Abacus 21's Point-of-Sale Processes... in effect automatically making Abacus POS Tickets from a Micros Import Batch file.
The following steps are required:
The Micros Point-of-Sale Import requires a generic Hotel Interface to be setup. The Hotel Interface will act as a cross-reference between System 441 Sections and the corresponding Micros Revenue Center codes.
Use the Quick Jump option within System 441 to go to the RSS or PSS menu. From the Menu, select the 'Hotel Interface Setup' Menu option.

Hotel ID – Input a code to identify the Hotel Interface.
Interface Directory – Not Required.
Default Client - Not Required.
Post in POS Register - Not Required.
People Definition Labels:
People Type 1 (Adults) – Not Required
People Type 2 (Kids) – Not Required
People Type 3 (Infants) – Not Required
People Type 4 (Other) – Not Required
Interface by Section -
Select a Section to modify from the list... and click on the Add (for new Sections) or Edit (for existing Sections) button.
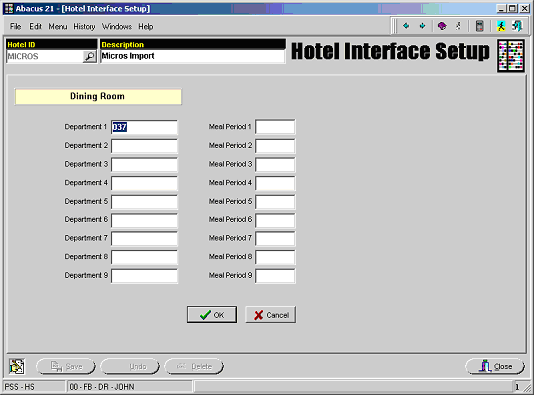
Micros POS (from a Hotel PMS perspective) supports only nine (9) breakouts of a POS Tickets.
Since Abacus 21's POS can support an unlimited number of POS Ticket-Item breakouts, a 'mapping' has to be done.
Department Code – Input the Micros Revenue Center code into the Department Code field for each Price level & Meal Period that will be imported.
Meal Period – Not Required
Repeat the Section setup for any Sections that will be imported into System 441 from Micros.
Use the Quick Jump option within System 441 to go to the RSS or PSS Menu. From this Menu, select the 'Staff Maintenance' Menu option.
From within Staff Maintenance, input the Staff ID into the Staff Code field... and then click on the 'Personal' tab.
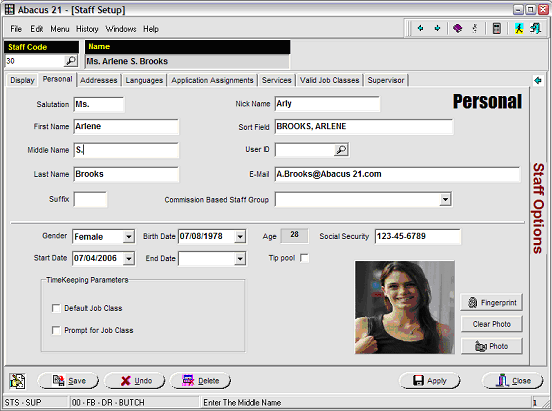
Social Security Number – This field will be used to store the cross-reference information to link the Abacus 21 Staff Code to the Micros Staff Code. Input the Micros Staff ID into this field.
After inputting the Staff ID cross-reference, click on the Save button to store the changes.
Repeat this setup for any Employees that will be attached to Tickets that are to be imported from Micros.
Note: If explicit Staff identification is not necessary, a 'generic' Employee can be set up to encompass any/all POS Tickets.
Use the Quick Jump option within System 441 to go to the RSS or PSS Menu. From this Menu, select the 'Payment Types' Menu option.

At the Payment Type Code prompt, input the System 441 Point-of-Sale payment code(s) that will be used for transactions.
Section Setups (within Payment Types) –
To add a new Section, click on the Add button. Select the Section from the list and click on the Edit button to modify an existing Section setup.

Within the Section screen for the Payment Type setup, click on the 'Hotel Defaults' button:
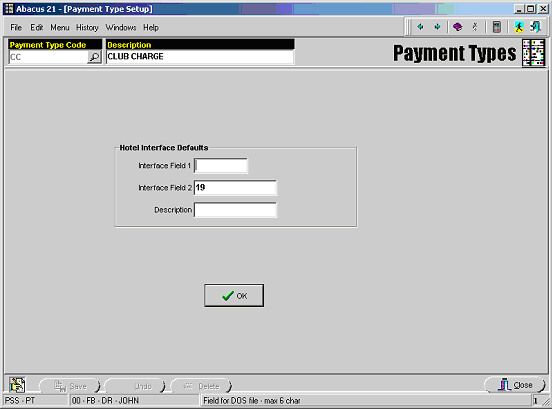
Interface Field 2 – This field is the cross-reference to link the Micros Payment Code to the System 441 Payment Code. Input the Micros Payment Code into this field.
Repeat this process for all Sections and Payment types that will be imported into System 441 from Micros.
Within the Section portion of the System 441 Company Setup, all Sections that are to be imported into System 441 from Micros MUST be set up with Taxes and Service Charges disabled.
Taxes, Service Charges, and Gratuity amounts are calculated in Micros Point-of-Sale. As a result of this, the Tax, Service Charge, and Gratuity information is imported into System 441 Point-of-Sale as individual line Items on the Point-of-Sale Tickets.
The following files are required to use the Micros Point-of-Sale import:
QuickChargeLQPGA.exe – This is the stand-alone executable program used to import the transactions from Micros and into System 441 Point-of-Sale.
QuickChargeLQPGA.ini – This configuration file contains the default information for the import of transactions into System 441 Point-of-Sale from Micros.
Configuration File Settings:
Open the QuickChargeLQPGA.ini file in Notepad within Windows.
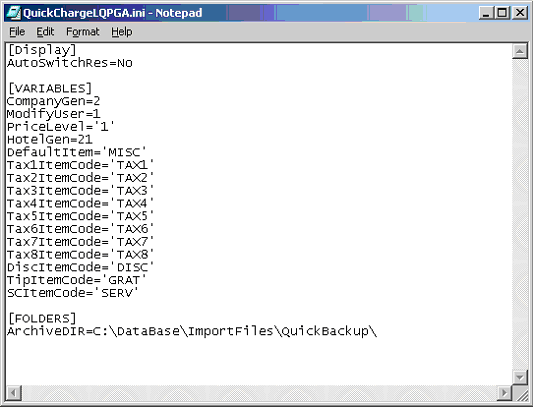
CompanyGen – Company to import the transactions into. This information is located in the CompanyGen field in the Company table within the System 441 database.
ModifyUser – Set to 1.
PriceLevel – Default Price Level/Meal Period to use for imported transactions.
The Price Level (Meal Period) code does need to be enclosed by single quotes.
HotelGen – Hotel Interface setup that stores the cross-reference information for Sections. Stored as the HotelGen field in the Hotel table in the System 441 database.
DefaultItem – Default Item Code to use when the import does not find a matching record for either the Item Code or the Item-UPC Code.
Must be enclosed by single quotes.
Tax1ItemCode – Item Code to use to import the Tax 1 amount from Micros.
Must be enclosed by single quotes.
Tax2ItemCode - Item Code to use to import the Tax 2 amount from Micros.
Must be enclosed by single quotes.
Tax3ItemCode - Item Code to use to import the Tax 3 amount from Micros.
Must be enclosed by single quotes.
Tax4ItemCode - Item Code to use to import the Tax 4 amount from Micros.
Must be enclosed by single quotes.
Tax5ItemCode - Item Code to use to import the Tax 5 amount from Micros.
Must be enclosed by single quotes.
Tax6ItemCode - Item Code to use to import the Tax 6 amount from Micros.
Must be enclosed by single quotes.
Tax7ItemCode - Item Code to use to import the Tax 7 amount from Micros.
Must be enclosed by single quotes.
Tax8ItemCode - Item Code to use to import the Tax 8 amount from Micros.
Must be enclosed by single quotes.
DiscItemCode - Item Code to use to import the Discount amount from Micros.
Must be enclosed by single quotes.
TipItemCode - Item Code to use to import the Gratuity amount from Micros.
Must be enclosed by single quotes.
SCItemCode - Item Code to use to import the Service Charge amount from Micros.
Must be enclosed by single quotes.
After all necessary changes have been made to the configuration file, Save and Close the file.
Importing Transactions into System 441 Point-of-Sale -
Launch the Quick-Charge Import (QuickChargeLQPGA.exe) program to import transactions into System 441 Point-of-Sale from Micros:
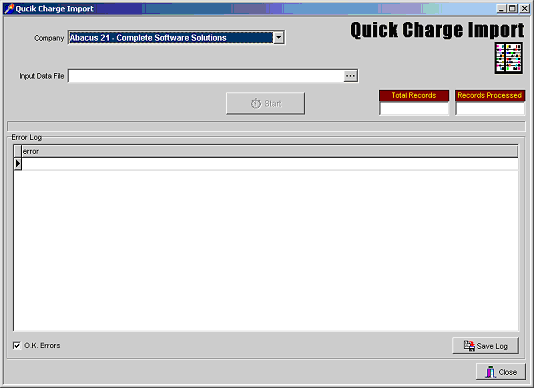
Company – Company to import transactions into. This field will default to the Company defined in the Configuration File setup.
Input Data File – Enter the file to be imported into System 441 Point-of-Sale. Use the browse button to the right of the field to select the file to import.
O.K. Errors – Check this box to automatically OK any errors that the import encounters.
After selecting the Company, Input Data File, and other Options, click on the Start button to begin the import process.
When the import is complete, a box showing “Import Complete” will appear. Click on the OK button to continue.
If any errors are found when importing the transactions (such as Item Codes not found, Payment Types not found, etc.), click on the Save Log button to save a Log File of all errors.
If an Item Code is reported as being not found, no matching record was found for either an Item Code or an Item-UPC code within System 441. In this case, the Default Item Code from the Configuration file will be shown on the Point-of-Sale Ticket in System 441.
Click on the Close button to exit the Import program.
System 441 Point-of-Sale Register -
After the transactions have been imported into System 441 Point-of-Sale, a Point-of-Sale Register must be run to update the transactions to the Member Accounts, G/L Accounts, Item Histories, etc.
Use the standard procedures for running a Point-of-Sale Register to update these transactions.
NOTE: It is strongly recommended that only one Import File be processed at a time. Prior to importing a second file, update the Point-of-Sale Register for the first imported file.
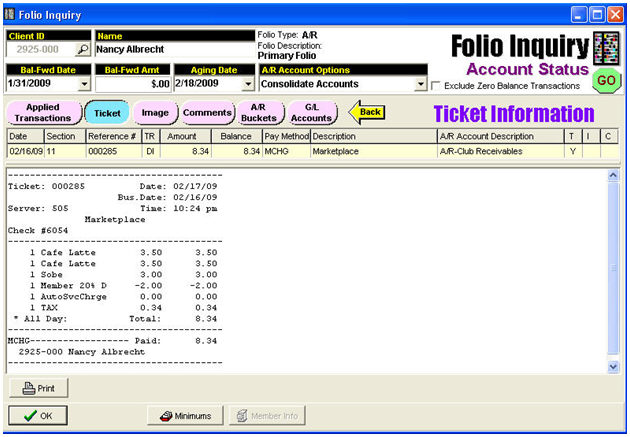
Example of Micros-Imported (and re-constructed) Charge within Abacus 21 Member A/R-Folio:
![]()