

In this section, the Workstation-specific controls and parameters are set.
Select the desired Workstation from the initial grid display:
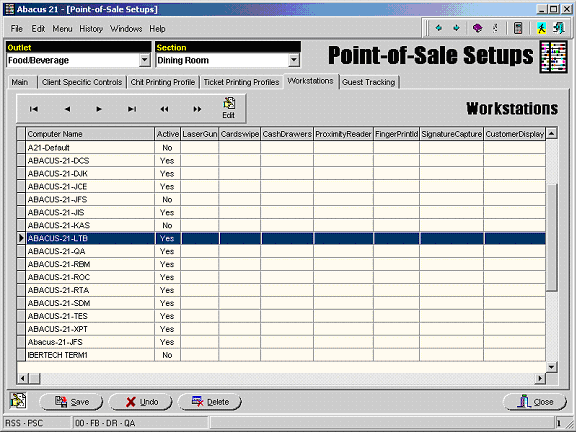
Once a Workstation is selected, there are two functions available:
Reset to Defaults
Copy
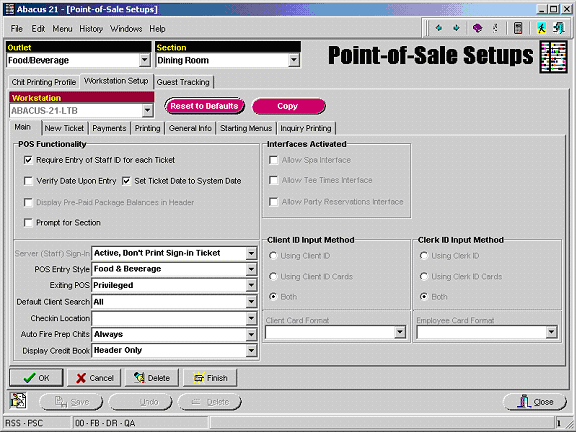
Reset to Defaults If this option is selected, this sets all the Workstations to whatever the A21-Default Workstation variable settings are set to.
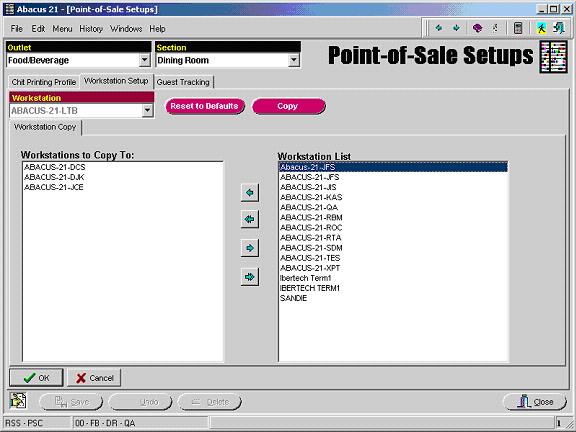
Copy This option allows the settings of the selected Workstation to be copied to one or more other Workstation(s). When the Copy button is pressed the following screen will be displayed to allow the user to indicate the target Workstation(s) for the copy:
The POS Workstation Configuration is then broken into seven areas:
Main - General overall functionality.
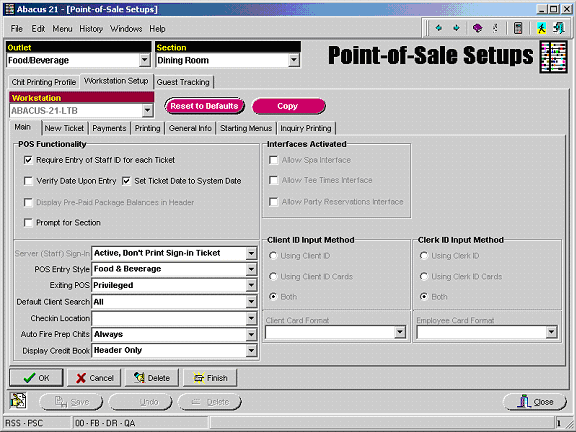
POS Functionality Check the desired functions or select the desired option:
Require Entry of Staff ID for each Ticket Check this if the Staff Person should be re-identified after each Ticket is either Exited or Completed.
Verify Date Upon Entry If this is checked, a calendar will be displayed upon entry into POS -- and the operator will be allowed to indicate the Business Date for the Tickets that are to be entered.
Set Ticket Date to System Date If this is checked, the System Date will be used as the Business Date for Tickets that are to be entered despite the current Business Date setting of the Workstation.
Display Pre-Paid Package Balances in Header for future use.
Prompt for Section When this is checked, the operator will be prompted to select a Section when a new Ticket is initiated. This is normally used for BackOffice operation or when a Cashier services multiple Sections.
Server (Staff) Sign-In for future use.
POS Entry Style:
Food and Beverage Presents a larger area for Item Menu (by expanding to 40-Button Mode).
Retail Presents a larger area for display of purchased Item information (by collapsing to 12-Button Mode).
Exiting POS:
Menu Allows uninhibited exit to (navigation) Menu.
Privileged Exit from POS is not allowed without the entry of a Staff ID with the appropriate privilege.
Default Client Search If a Client Search is requested, this setting determines which Client Type should be defaulted:
Member
Prospect
Other
All
Check-In Location for future use.
Auto Fire Prep Chits This setting determines when the System should automatically send Preparation Chits:
Always
Only upon Entry to Payment Screen
Upon Ticket Print or Payment Entry
Never
Display Credit Book If the Client has a Credit Book, this setting determines whether/where the balances should be automatically displayed in POS -- based upon the Client identified in the Ticket Header:
Header Only After the Client is identified in the Ticket Header.
Payment Only Upon entry to the Payment Screen.
Header and Payment At both junctures.
Do Not Display.
Interfaces Active Obsolete, since these controls now reside in the configurations of the respective application modules.
Client ID Input Method For Future use
New Ticket - Controls the functionality desired when a new Ticket is created.
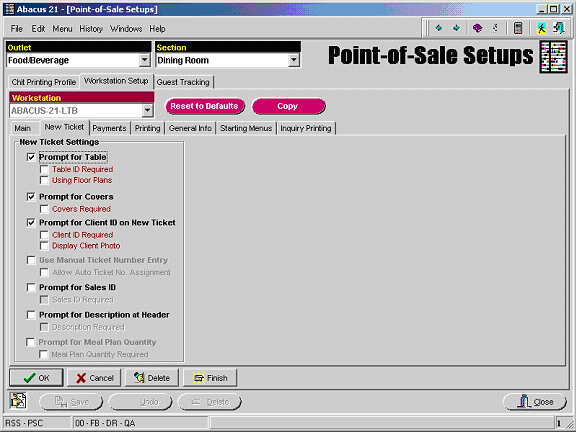
Prompt for Table Determines if the operator should be prompted for the identification of a Table.
Table ID Required Determines if the identification of the Table is 'Required' or 'Optional'.
Using Floor Plans Determines if the Table to be identified by use of a Graphic display of the Dining area rather than by typing a Table Number? (For future use -- with the Graphical Palette.)
Prompt for Covers - Determines if the operator should be prompted for the entry of the number of Covers.
Covers Required Determines if the entry of the number of Covers is required.
Prompt for Client ID on New Ticket - Determines if the operator be prompted for the identification of a Client at the initiation of a POS Ticket.
Client ID Required Determines if the identification of a Client at the head of a POS Ticket is required.
Display Client Photo If the photo is available, determines if the Clients Photo image should be displayed.
Use Manual Ticket Number Entry for future use.
Prompt for Sales ID Determines if the operator be prompted for the identification of a Sales Person at the initiation of a POS Ticket.
This is at the head of the POS Ticket and is different from the identification of a Sales Person on individual Items that are sold on the POS Ticket which is controlled by a flag in Item Setup.
Sales ID Required for future use.
Prompt for Description at Header - Determines if the operator should be prompted for the entry of a Ticket Description at the initiation of a POS Ticket.
Description Required for future use.
Prompt for Meal Plan Quantity for future use.
Payments - Controls the POS Payment Screen.
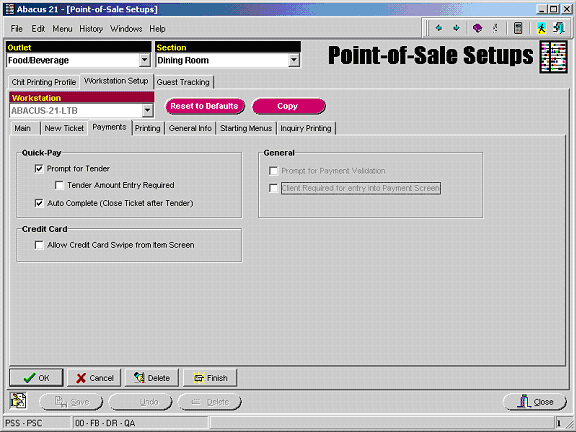
Quick-Pay Check the desired features:
Prompt for Tender This is used in POS to activate the request to have the Server/Clerk enter the customer's Amount Tendered (eg, $20.00 for a $20-dollar bill).
Tender Amount Entry Required Forces a Tender Amount needs to be input.
Auto Complete (Close Ticket after Tender) When the Quick-Pay button is clicked (and Auto Complete is checked), the System will automatically close the ticket (instead of taking the operator to the Payment Screen for input.
Credit Card - Check the desired features:
Allow Credit Card Swipe from Item Screen Determines whether the operator should be allowed to swipe a Credit Card on the Item Entry screen to initiate a payment.
General For future use.
Printing - Controls the POS options for printing at a Workstation.
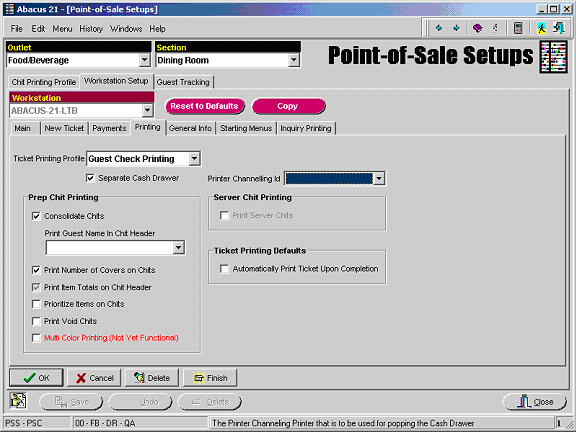
Ticket Printing Profile Choose the Ticket Printing Profile (as defined in POS System Configuration Ticket Printing Profiles) that is to be used when POS Tickets are printed from this Workstation.
Separate Cash Drawer Is there a Cash Drawer separately attached to the Workstation rather than through the Ticket Printer?
Printer Channeling ID If the Cash Drawer is separately attached, indicate the Printer Channeling ID through which the Cash Drawer is to be accessed.
Prep Chit Printing Indicate the options that will control the production of Preview and Fire Chits when they are produced from this Workstation.
Consolidate Chits If there are multiple occurrences of the same Item on the same Ticket, should they be consolidated into a single entry on the Preparation Chit?
Print Guest Name in Chit Header Should the name of the Client be printed in the head of the Preparation Chit? If so, in what form. Select the desired option:
N - Do Not Print Name
L - Last Name, First Name
D - Display-Name (from Client Setup)
Membership-Name
Y - 'Name' from the POS Header, which can be (based on other settings) either:
Membership-Name
Full-Name
Occupant-Name
Local-Guest-Name (from a Hotel Interface)
Print Number of Covers on Chits Determines if the number of Covers at the Table should be printed in the top segment of the Preparation Chit.
Print Item Totals on Chit Header Determines if the Subtotal of the Ticket should be printed in the header of the Preparation Chit.
This can be handy if the system were to go down due to loss of power or other catastrophic difficulties.
Prioritize Items on Chits Determines if the items on the Preparation Chit should be printed in order based upon the Chit Print Sequence as defined on the Food Info screen of the Section Info tab of Item Setup.
Print Void Chits Determines if a Chit should be printed in the Preparation Area to inform the prep staff that an Item that had previously be Fired to the kitchen has now been Voided -- so that the Kitchen/Bar Staff know that the Item no longer needs to be prepared.
Multi Color Printing (Not Yet Functional) For future use.
Server Chit Printing - Reserved for future use.
Ticket Printing Defaults -
Automatically Print Ticket Upon Completion When a Ticket is completed -- and if the Ticket had not already been printed -- determines if a copy of the Ticket should be automatically printed upon Completion.
General Info - This area allows for the configuration of peripheral equipment that may be used to enhance a Workstations POS functionality.
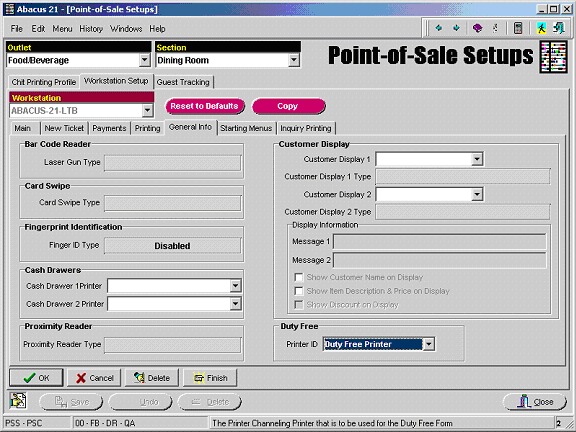
Bar Code Reader
Laser Gun Type Currently all supported barcode readers are Keyboard Wedge devices and do not require specific configuration.
Card Swipe
Card Swipe Type Currently all supported Card Swipe readers are Keyboard Wedge devices and do not require specific configuration.
Fingerprint Identification Fingerprint ID Type Currently only a single Fingerprint ID interface is available. However, this interface is available with a wide variety of Fingerprint Scanners. Please contact Abacus 21 for your specific requirements.
Cash Drawer Currently only a single Cash Drawer is supported. This Cash Drawer must be attached to the Ticket Printer or configured as a second Windows printer on the Workstation.
Proximity Reader For future use.
Customer Display For future use.
Customer Display 1 Enter the Printer Channeling ID that is mapped to the Customer Display.
Customer Display 1 Type Identify the Type of the Customer Display so the correct interface may be used. Please contact Abacus 21 for the varieties that are supported.
Customer Display 2 Enter the Printer Channeling ID that is mapped to the Customer Display.
Customer Display 2 Type Identify the Type of the Customer Display so the correct interface may be used. Please contact Abacus 21 for the varieties that are supported.
Display Information Now that the System knows where to find the Customer Display (Customer Display X) and how to communicate with the Display (Customer Display X Type), this setting establishes what information should be displayed on the Customer Display:
Message 1 Enter up to 40 characters that should be displayed on the Customer Display between Tickets usually a Welcome message.
Message 2 Enter up to 40 characters that should be displayed on the Customer Display between Tickets.
Show Customer Name on Display When a Client is identified at the Head of a Ticket, should their name be shown on the Customer Display.
Show Item Description & Price on Display As Items are sold, should the Items Description and Price be shown on the Display.
Show Discount on Display If there is a discount on the Item that is sold, should the Discount Amount be shown on the Customer Display.
Duty Free Here information regarding Duty Free processing for the specific Workstation is entered:
Printer ID Enter the Printer Channeling ID for the printer where the Duty Free form should be printed.
Starting Menus - This screen controls the Starting (POS Touch Button) Menu for each of the respective (up to potential nine) POS Price Levels (or Time-of-Day Meals for F/B Point-of-Sale):
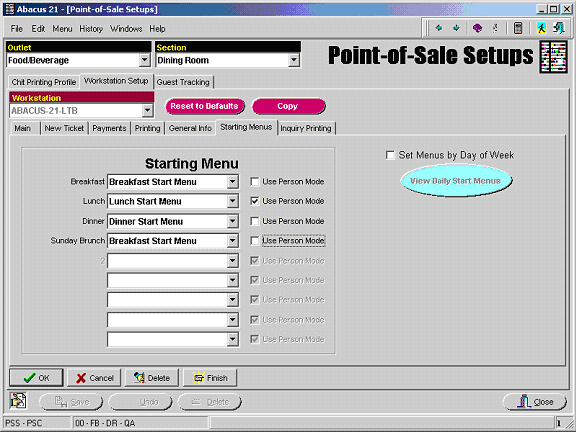
Starting Menu Identify the initial Menu (as defined in POS Touch Button Setup) that should be displayed when entering Items in POS for each Meal Period/Price Level.
Use Person Mode With each Meal Period/Price Level, should the Ticket be defaulted into Person Mode (aka Seat Mode) where each Item is to be identified with the Person (or Seat) who ordered the Item.
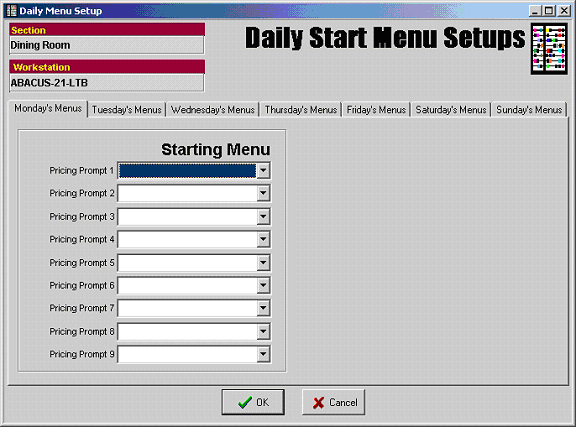
Set Menus by Day of Week If desired, check here -- which will enable you to identify the Starting Menus separately for each day of the week:
Inquiry Printing - Controls the defaults for the printing of the Server Inquiry from within POS.
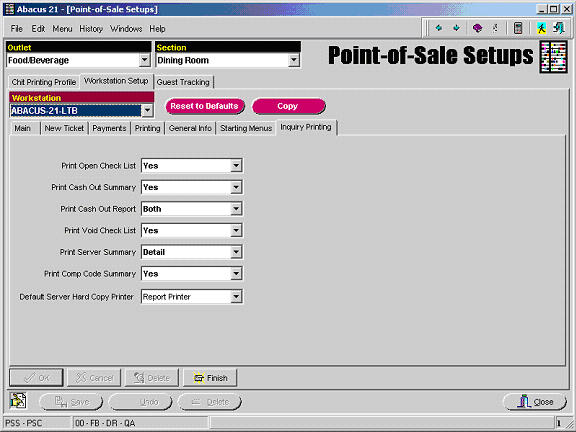
Print Open Check List Print a list of Open Tickets: Yes or No
Print Cash Out Summary Print a summary of receipts by Payment Type: Yes or No
Print Cash Out Report Print a detail of each payment by Payment Type. If so, what Tip or Service Charge information should be included?
Service Charge
Tip (Gratuity)
Both (Tip and Service Charge)
No
Print Void Check List Print a list of Voided Tickets: Yes or No
Print Server Summary Print the Server Summary section? If so, how?
Yes (in summary form)
Detail
No
Print Comp Code Summary Print a list of Comp/Markdown Items: Yes or No
Default Server Hard Copy Printer Select the Printer ID where the Server Inquiry should be printed from this Workstation.