
Item Maintenance (IN4-ISS) Option of Item Maintenance
Each Modifier must be set up as an Item within Item Maintenance.
It is recommended that you choose Item Codes in a series; for example, all Modifier Item Codes are in the 100 series. This will make it easier to locate the Modifiers when you are building the Modifier Menus and Prompts.
When building your Modifier items, must go to the Section Tab, fill in all required fields. It is recommended you use a Sales Category called Modifier. Then go to the Food Info button and check the ‘Item is a modifier’ box. Please refer to the System 441 Item Setup Documentation for further information on setting up Modifier items.
POS Touch Button Menu Setup for Modifiers (Quick Jump PS1, PSS) Option POS Touch Button Setup
This option is used to group together like Modifier Items on one Touch Menu. These buttons are Modifier Choice Alternatives.
For example, all of the various types of Salad Dressings available.
Menu Code: Begin each of these codes with an M- to assist in look-ups later on. This will group together all of your Modifier Menus.
For example, ‘M-DRESS’, the description being ‘M-Salad Dressing Menu’.
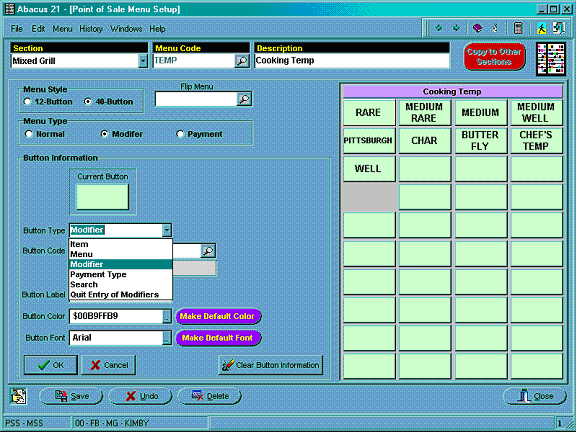
Menu Style: Keep to the 40-Button Style to stay consistent in the look of the screens.
Menu Type: Modifier
Flip Menu: Not used for modifiers
Click on the Button you wish to set-up.
Button Type: A Modifier can be defined as a Modifier, a Menu (of different Modifiers, or can be a Search. The Sales Category assigned to the Item defines these Searches. Typically, though, you would choose Modifier for all of the forced Modifiers you are setting up.
Button Code: Enter the Item Code of the Modifier.
Button Label: The Label is what actually appears on the Button. If you skip a space in your Label, the description will double stack in the button, allowing you more letters on the button.
Button Color: Select the Color of the Button.
Button Font: Select the Font of the Button.
The screen below shows a typical Modifier Touch Menu layout:

Modifier Prompts (PS1-PSS) Option Modifier Prompts
The Modifier Prompt allows you to define the question prompt and it’s requirements, per Section. It provides the ‘link’ to the Modifier Menu.
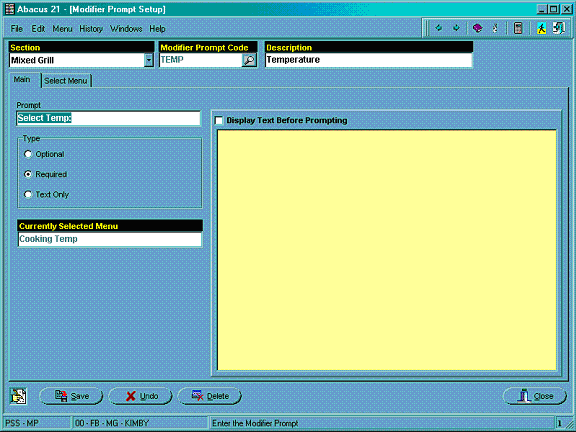
For the appropriate Section, Create a Modifier Prompt Code. It is recommended that your code be easily identifiable, pertaining to its nature. For example, TEMP, description ‘Temperatures’; DRESS, description ‘Dressings’.
Prompt: The actual words that will appear on the Point-of-Sale screen. For example, ‘Select a Cooking Temperature’.
Type: Is this Modifier Optional or Required?
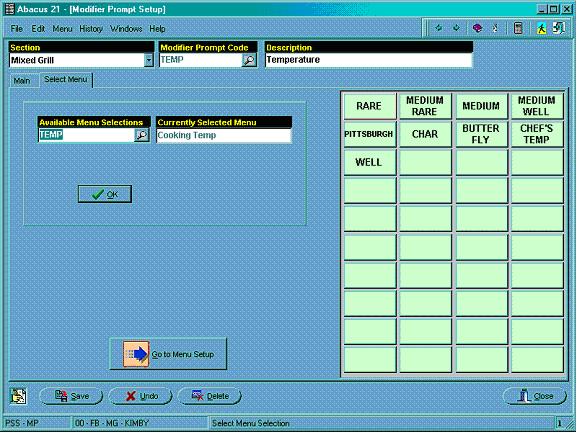
Go to the Select Menu Tab.
Available Menu Selections: Type in or look-up the appropriate Menu for this Modifier Prompt. If you began the Menu Code with M-, you can use this when doing the look-up. After you select a Menu code, the Menu will appear on the right side of the screen.
Click OK and Save.
Below is an example screen of a typical Modifier Prompt Setup (Main Tab):

The 'Select Menu' Tab (pictured below) is where you select the Menu that you created above in POS Touch Button Setup:

Modifier Groupings -
Modifier Groupings allow the linking together of a series of prompts. When attached to a ‘parent’ Menu Item, create a series of ‘forced’ Modifiers. For example, when ordering a New York Strip Steak, there are other items that automatically come with it. The Server will want to be prompted for a Temperature and a Starch.
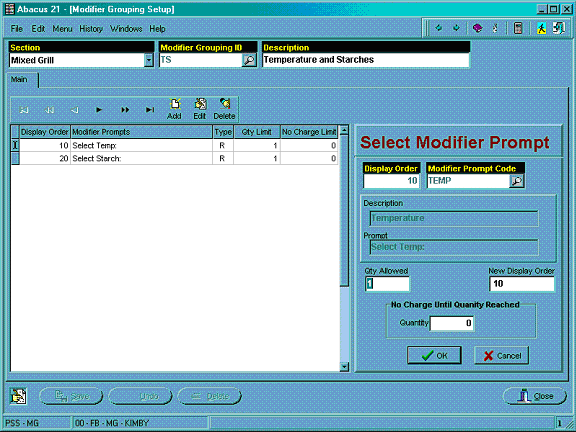
Modifier Grouping ID: Choose a code that makes sense for the modifiers that you are grouping. For example, using the example from above, I would create a code called TS, description ‘Temperature and Starch’.
Choose the ADD Button.
Display order: Begin with 10, skipping numbers in between (10, 15,20, etc). This is the order the Server will be ‘asked’ the Modifier Prompts within this group. If you ever choose to add another prompt in-between, you will have room to place the question between the current Prompts.
Modifier Prompt Code: Enter the Prompt Code. If you created an easily recognizable code as suggested above, remembering you codes will be easier. You may also use the look-up feature.
Quantity Allowed: This indicates how may times that particular prompt will come up. In some cases you may want the Guest to select multiple item from that menu. For example, 2 types of Vegetables.
No Charge Until Quantity Reached: For Future use.
Click OK and Save.
Below is a print screen of a typical Modifier Group (with the creation of the Temperature Prompt being highlighted):

For Forced Modifiers:
This step is only necessary for Forced Modifiers.
Once your Modifier Prompt or Groupings are completed, you can now go back into Item Maintenance and attached the Grouping onto the ‘parent item’.
Enter in the Item Code, go into the Section Tab, choose Food Info button.
Under Modifier Info, Click the Modifier Prompt (one choice) or Group Prompt (multiple choices).
Select the Prompt you wish, using the drop down arrow.
Please Note – if you set up your Modifier Items first, then setup your Prompts and/or Groups PRIOR to setting up your ‘Parent’ Items, they you will avoid this last step – having to go back in and attach these Prompts/Groups – because they will already be there as you build your ‘Parent’ Items.