
Within the Inventory System, a method for acknowledging Received Goods (without utilizing Abacus 21's Purchasing System) has been provided -- and is called Non-P/O Receiving. This sub-system allows you to note the Vendor, Date, Note, and received Inventory Items (with their respective Quantities and Costs).... and uses this information to re-quantify and re-cost the Inventory (and perhaps queue-up and print BarCode Tags-Labels) for those Items received.
Note that Non-P/O Receiving can not accommodate certain capabilities that are inherent within Abacus 21's full Purchasing System -- such as:
Ability to create Items 'on-the-fly' within Purchasing.
Establishing 'Expected' and 'Cancel' Dates.
Ability to automatically create the appropriate Journal Entries.
Ability to have Receiving integrate with Accounts Payable -- automating the process of pulling in a Received P/O(s) into A/P.
Explicit Vendor History.
Ability to reference existing Requisition Requests... or auto-create Requisitions to other Outlets.
Purchasing is integral to Open-To-Buy calculations.
Purchasing explicitly handles BackOrders.
The Purchasing System is, by definition, more robust in all regards.
One of the Inventory Management System Daily Transactions is Non-P/O Receiving:
Inventory Labels (with BarCodes)
Certain setups are required prior to beginning:
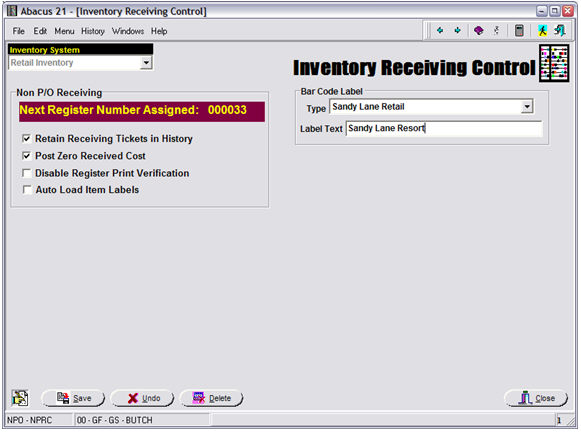
Note that the System shows the 'Next Register Number (to be) Assigned'.
Note that this does not 'jive' with the example presented below... as it normally would in practice.
Retain Receiving Tickets in History (Yes/No).
Post Zero Received Cost (Yes/No) -- 'No' prevents zero-cost Item receipts from distorting the Last Cost and Weighted Average Cost calculations.
Disable Register Print Verification (Yes/No) -- determines whether the 'Verification No' is required in order to be able to 'post' the Register.
Auto Load Item Labels (Yes/No) -- 'Yes' will trigger system to 'queue up' Labels (to be printed later).
If the Auto Load Item Labels is 'Yes', then:
A style of Label is selected (see Abacus 21 for standard alternatives... or for customizations).
The 'Branding' of the Label can be set via the Label Text.
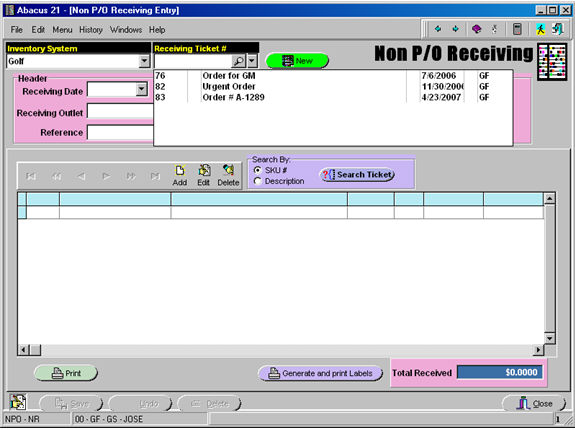
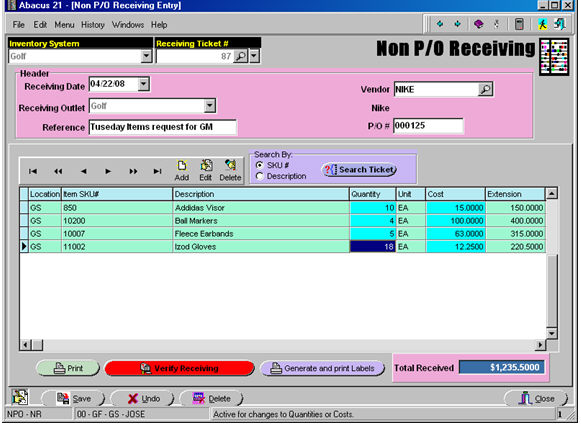
Selecting the Non-P/O Receiving Option (and, as an example, referencing an existing Receiving Ticket from the Golf Inventory System):
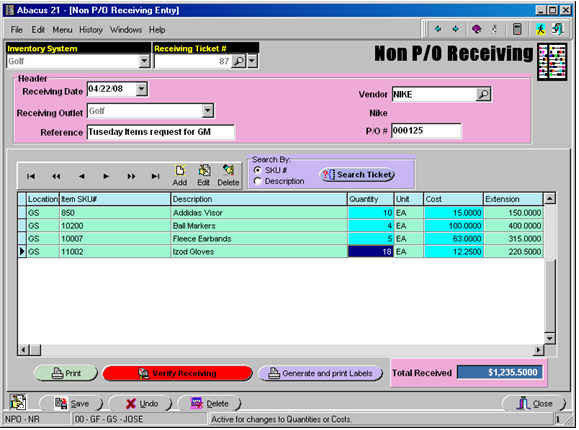
The Non-P/O Receiving application allows receiving Items in a quick-and-easy sequence.
The Inventory System “Golf” represents a reference to a particular composition of Inventory Items -- namely those that are related to Golf Inventory.
Note that Inventory Systems are used to segregate significantly different kinds of Inventories -- usually differentiated by areas of Responsibility.
Transactions can not cross Inventory Systems. Inventory, Purchasing, and Point-of-Sale activities that are aligned must reside within the same Inventory System.
An Inventory System may involve multiple Outlets and/or Sections (and/or Locations).... however, an Outlet-Section-Location can only be affiliated with one Inventory System.
The Receiving Ticket # allows you perform several tasks: The Lookup helps to find any particular entry by using the 'Ticket #' or the 'Reference' field (the example below being done by Reference field):
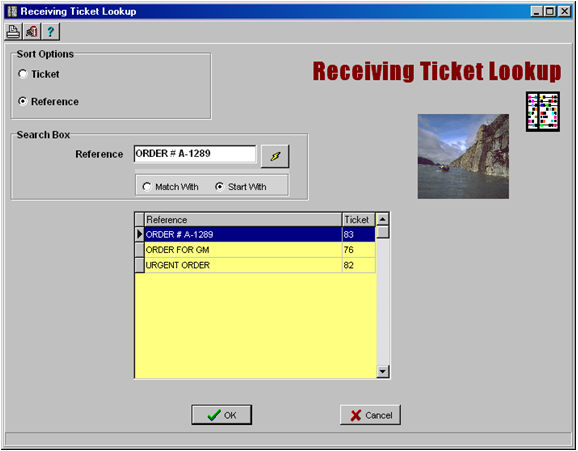
The Dropdown will show all the previous 'Receivers' that have not being posted -- ordered by Ticket Numbers. Finally, we can enter the Ticket Number if we know it:
In order to create a new entry, just need to click on the Green 'New' button. It will display the new incremented number for the Non-P/O Receiver:

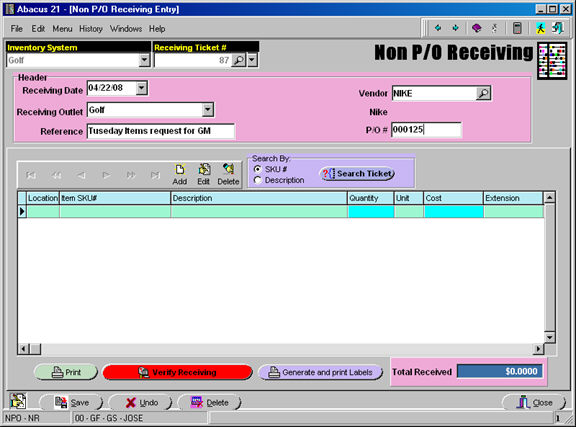
The Header information represents the following:
Receiving Date – Creation Date.
Vendor Code - The pertinent Vendor.
Receiving Outlet – Cost-Profit Center where the Items are to be acknowledged as received.
Reference – Very important information that will help in order to find the entry.
P/O # - The P/O Number affiliated with the received shipment... or some other relevant Reference.
At this point the screen is ready to enter the Items that were received by clicking the “Add” Button:
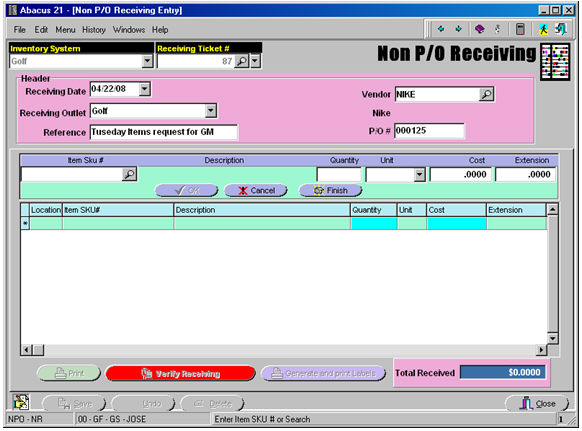
Enter the Item-Code or use the search to find the Item. The search allows to use the following criteria:
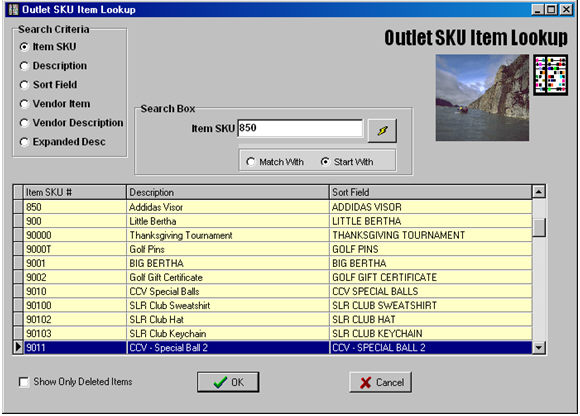
Select an Item (for example, the first Item 'Addidas Visor'):

Once the Item-Code is entered, it will display the Receiving-Unit from Item Maintenance. Then, the Quantity and Cost need to be filled in. Clicking “OK” will prompt for the next Item, otherwise click on“Finish”.
The following screen illustrates the entry of several Received Items:
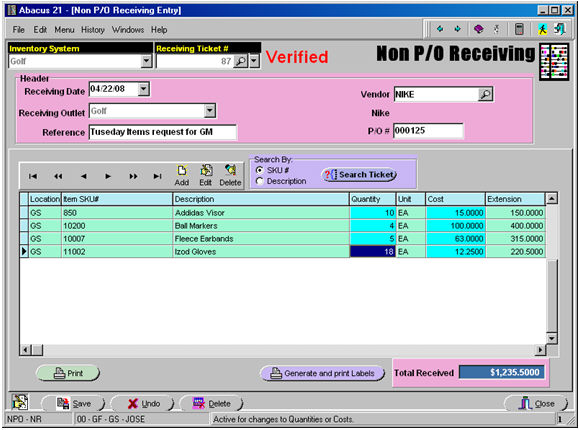
The following steps are required in order to have these entries ready for Posting:
Print the Non-P/O Receiver, then click on “Verify Receiving”.
Finally, “Save” and “Close”.
If the Non-P/O Receiving Ticket has been properly process (Verified), the screen should look like this (note the 'Verified' in red at the top):
Search Ticket – Allows a lookup among the entries by Items-Code or Description.
Generate and Print Labels – A feature to print BarCode labels. (The appropriate number and style of Labels will be queued up for printing... based on the Quantity and Label-style associated with each respective Item.)
After Non-P/O Receiving 'Entry', but prior to posting the Non-P/O Receiving 'Register', the Item's Status -- available from right-clicking on the Item-Location screen within Item Maintenance -- would show (for example):
To 'complete' the Non-P/O Receiving Process, you must now run the posting Register:
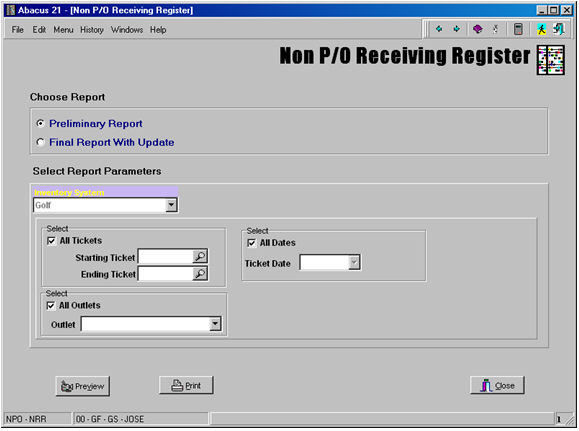
The Non-P/O Receiving Register is the final step in order to update the Quantity and Cost of each of the received Items into the Inventory System.
The following variations can be used:
Preliminary Report – Used to view the information -- but not post.
Final Report With Update – It will update Quantity and Cost.
The following selectivity is available:
All Tickets or a range of them.
A Single Outlet or All.
A specific Ticket Date or All.
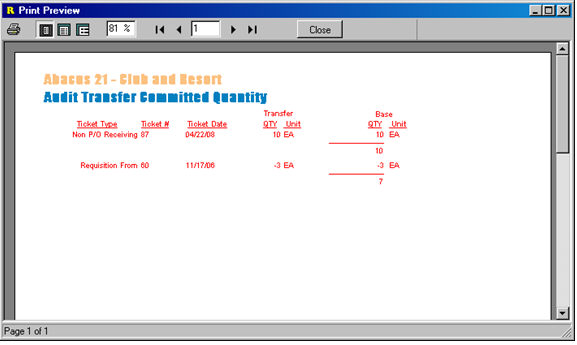
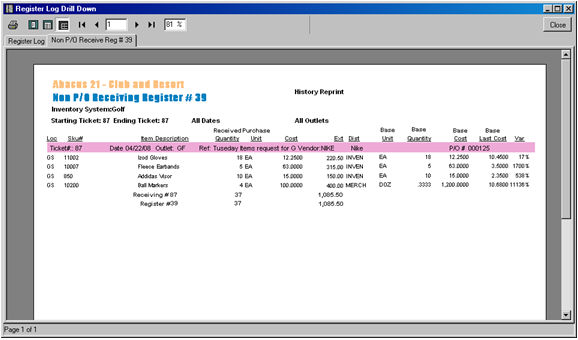
The Non-P/O Receiving Register prints valuable information to be analyzed (Register #39, showing Non-P/O Receiving Ticket #87):
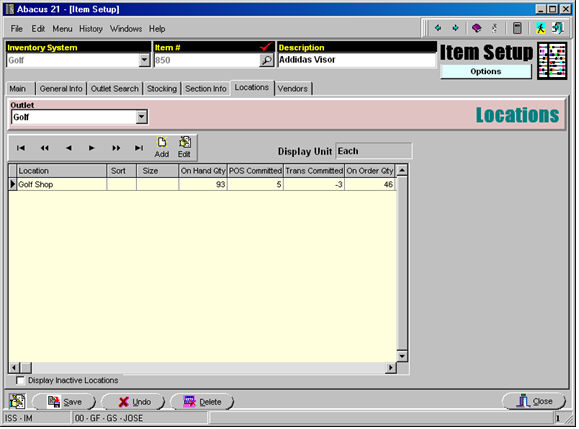
Item Maintenance (Location tab) shows a new Quantity On-Hand:
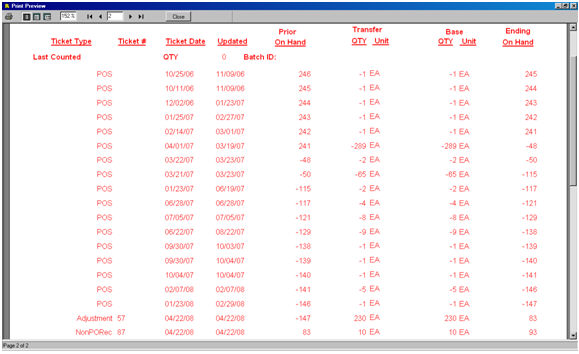
A right-click Audit on the On-Hand Quantity for the Location shows Non-P/O REC # 87:
Inventory Labels (with BarCodes) -
This option is used to select and print the BarCode Labels.
The process involves three steps:
Selecting which Items to throw into the 'print queue'.
This involves determining the Default Quantity of Tags-Labels to assume for each Item.
Review and perhaps adjusting the Items and there respective default Quantities to print.
Printing the Tags-Labels themselves.
Note: this example is unrelated to the Non-P/O Receiving sequence flow illustrated above.
The 'Select' tab allows you to pick-and-choose which set of Item Labels to print:
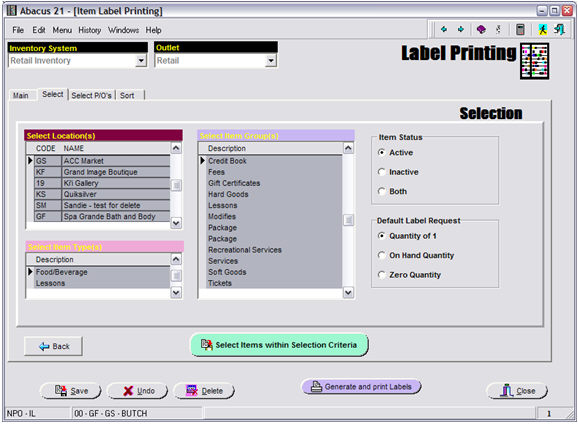
Within an Inventory System and Outlet, you can select:
One or more Locations.
One or more Item-Types.
One or more Inventory-Groups.
By Item Status: Active, Inactive, or Both.
Default Label Request:
Quantity of 1 - will print only one (1) Label for each Item (eg. for Shelf Labels)
On-Hand Quantity - will print the number of Labels equivalent to the Total On-Hand (for initial Labelling of Inventory-Items).
Zero-Quantity - will default in a Quantity of zero (0)... implying that you intend to override the defaults for selected Items.
Selectivity of Label Printing for Items can also be based on "Select P/O's" related alternatives:
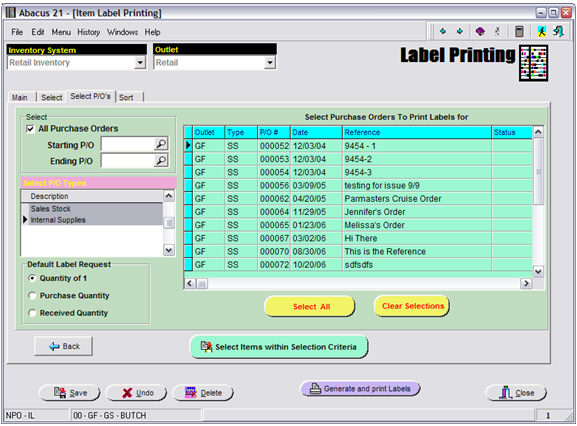
Alternatives of selectivity can include:
Purchase Orders - Select 'All' or a P/O-No Range or specific one(s).
Select by P/O-Type(s).
The Default Label Request Quantity can also be set:
Quantity of 1 (for each Item) -- again, perhaps for Shelf labels.
Purchase Quantity (as opposed to Received Quantity)... to have them "ready".
Must be using Abacus 21's Purchase Order System for this... not appropriate for Non-P/O Receiving since no 'Purchase Quantity' (vs. 'Received' Quantity) is known.
Received Quantity -- print as many Labels for an Item as were actually Received.
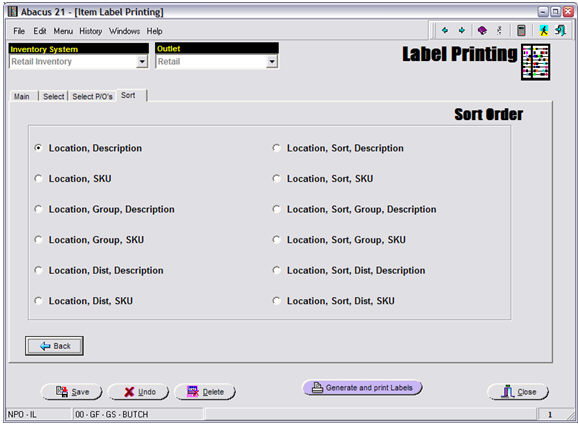
The BarCode Labels (when printed out) can be sorted by the following options:
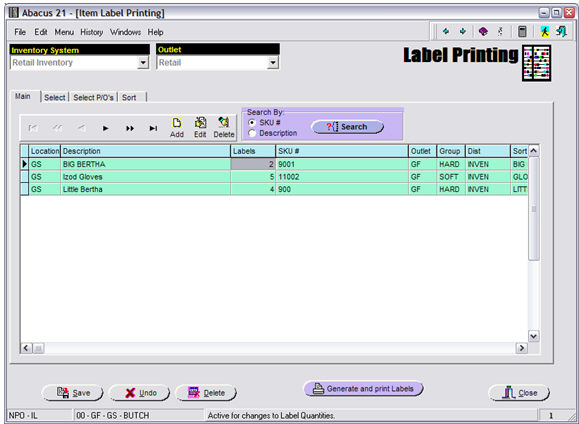
Return to the 'Main' Tab to review the results of your selection process:
Note that in the 'Labels' column, Quantity of Labels requested (which was initially established by the Default Quantity choices) can be overridden for any selected Item.
Hit the 'Generate & Print Labels' Button when the selection of Items is to your satisfaction.