
The Ticket Printing Profile defines how POS Tickets (GuestChecks or Receipts) are to be printed.
Note: Although the POS Configuration is defined within a Section, these Profiles are available in any Section within the Company.
![]()
The screen below shows sever Ticket Printing Profiles.
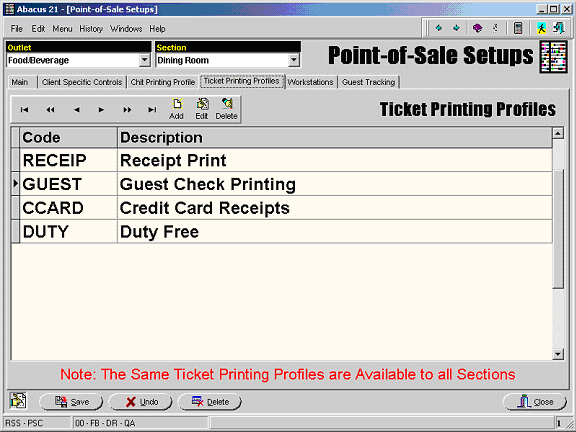
The Ticket Printing Profile is broken into three segments:
Printers - This area identifies the printers to which the Tickets are to be directed. The printers referenced in this section are defined in Printer Channeling.
Ticket Detail - This area determines which/how informational elements are printed on Tickets.
Ticket Dimensions - This area determines the overall 'size' of the Ticket.
This area identifies the printers to which the Tickets are to be directed. The printers referenced in this section are defined in Printer Channeling.
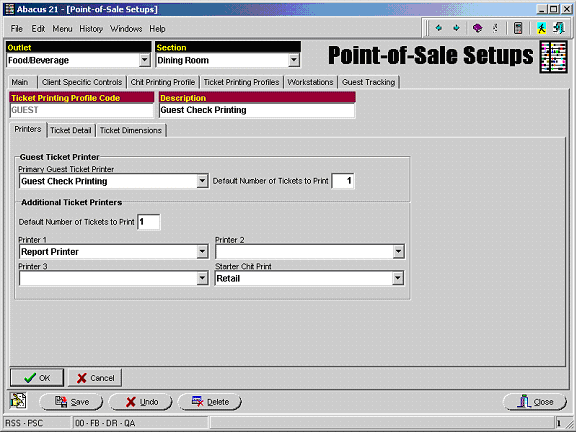
Guest Ticket Printer -
Primary Guest Ticket Printer – Identify the Printer where the POS Tickets are to be printed.
Default Number of Tickets to Print – When the POS Tickets are printed, how many copies are to be produced.
This is normally set to '1'.
If the POS Printer is thermal and multi-part paper cannot be used, use this control to instruct the system to print multiple copies.
Additional Ticket Printers - When the POS Ticket is printed, additional copies may be automatically printed at other locations – usually for audit purposes. (This is where up to three additional locations can be identified.)
Default Number of Tickets to Print – Indicate the number of copies of the POS Ticket to be printed at each of the identified Additional Ticket Printers.
Printer 1 - Select the first Additional Ticket Printer. Optional.
Printer 2 - Select the second Additional Ticket Printer. Optional.
Printer 3 - Select the third Additional Ticket Printer. Optional.
Starter Chit Print – Starter Chits (or Pickup Chits) are basically admission tickets that are printed by POS and taken by the Customer to another location to be used for admission or redemption.
See Inventory Item Setup for further explanation of the various printing modes.
Identify here the printer where these Starter Chits are to be printed.
Usually this is set to the same printer as the Primary Guest Ticket Printer.
This area controls the printing the Detail of the POS Ticket – Header, Items, and Payments.
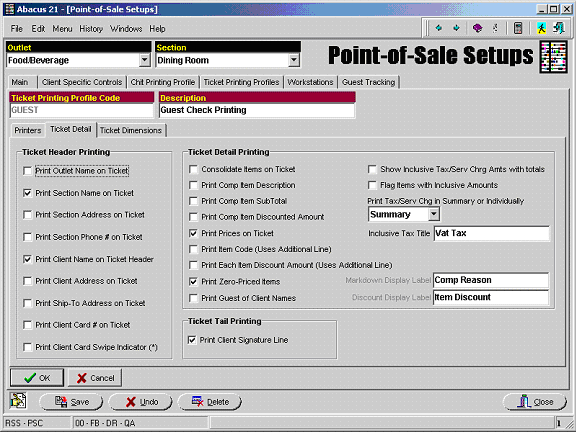
Ticket Header Printing – Check the items that are desired to be printed in the POS Ticket Header:
Print Outlet Name on Ticket
Print Section Name on Ticket
Print Section Address on Ticket
Print Section Phone # on Ticket
Print Client Name on Ticket Header
Print Client Address on Ticket
Print Ship-To Address on Ticket (The Ship-To Address is entered during the POS process.)
Print Client Card # on Ticket (If the Client was identified by means of a Card, the Card number may be printed.)
Print Client Card Swipe Indicator (*) – This indicator is printed if the Client was identified to the POS System by the swiping of a Card rather than by the manual entry of a Member or Prospect number or by means of the Client Search.
Ticket Detail Printing – Check the items that are desired to be printed on the POS Ticket or make appropriate selection:
Consolidate Items on Ticket – If the same Item occurs multiple times with the same Price and Description, they will be consolidated into a single line on the POS Ticket.
The reason the Price must be the same is that the Item may be either Open-Priced or Comp’d.
The reason the Description must be the same is because the Item may be Open Description.
See Item Setup for more information on these topics.)
Print Comp Item Description – Print the Description of the Comp Reason Code.
If this is checked and there is an Item on a Ticket that is comp’d, then (after printing the line which contains the Item Description, Price, etc.) an additional line prints which displays the transaction Reason Description.
Print Comp Item Subtotal – Include the total of the Comp Amounts in the Subtotal section of the Ticket for each Comp Reason.
If this is checked, after printing the line which contains the Item Description, Price, etc. prints, two additional lines are printed: one with the Original Price and one with the Comp'd (Markdown) Price.
Print Comp Item Discount Amount.
Print Prices on Ticket – Unit prices may be printed in addition to the Line Item Extensions. This is done the at the expense of losing a portion of the Item Description.
Print Item Code (Uses Additional Line) – The printing of the Item Code requires the use of an additional line on the POS Ticket for each Item.
Print Each Item Discount Amount (Uses Additional Line) – Discounts are normally only displayed in summary in the Ticket Subtotals. This option allows the Discount applicable to each Item to be printed with the Item. Again – this requires the use of an addition line on the POS Ticket for each discounted item.
If a Ticket has multiple Discount Types, these are distinguished by different letters: A,B,C, etc. and noted as such on the bottom of the Ticket (with an respective aggregate total for each).
Print Zero-Priced Items – Should Zero-Priced Items be included on the POS Ticket or suppressed?
Print Guest-of-Client Names – If the Guest Tracking capability (separate module) is used, should these Guest Names be printed on the POS Ticket?
Show Inclusive Tax/Serv Chrg Amts with totals – If this is not checked, there will be no reference of Inclusive Tax or Service Charge amounts on the POS Ticket.
Flag Items with Inclusive Amounts – Items with Inclusive Tax will be indicated on the POS Ticket with “>” to the right of the extension.
Print Tax/Serv Chrg in Summary or Individually – Indicate Summary or Individually.
The total for each Inclusive Tax or Service Charge may be printed, or
All of the Inclusive Taxes or Service Charges may be summarized to print on a single line.
Inclusive Tax Title – If the Inclusive Taxes are to be printed in summary, this is the title that will be printed before the amount (since the individual Tax Names would be inappropriate).
Markdown Display Title – for future use.
Discount Display Title – for future use.
Ticket Tail Printing – Check the items that are desired to be printed on the POS Ticket:
Print Client Signature Line
This areas controls the basic constraints of the POS Ticket Form.
There are three basic types of Tickets:
Hard Ticket
Soft Ticket
Pre-Printed
First you must select the appropriate type. Then answer the questions in that type’s area of the screen:
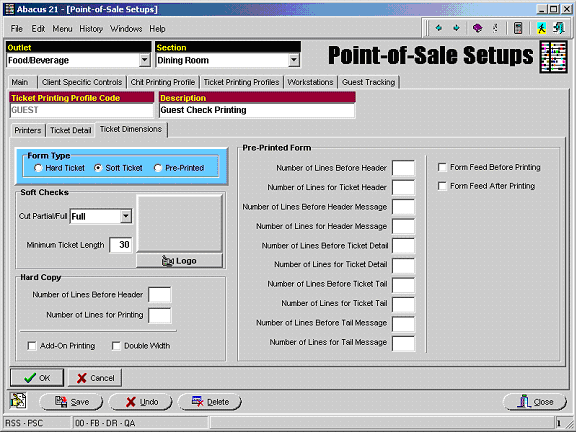
Soft Tickets – Soft (or SoftCopy) Tickets are Tickets printed on unformatted rolls of paper.
The paper can be either single-ply or multiple-ply -- and can be Thermal or Dot Matrix (impact).
Cut Partial/Full – The options are Full Cut and Partial Cut.
Most Soft Ticket Printers have the ability to either cut the paper entirely or to leave Ticket connected to the roll by a very small segment of uncut paper.
The partial cut option keeps multiple Tickets connected when they have been printed but not removed from the printer.
It is usually preferable to use the partial cut option as it is less likely to lose Tickets and also keeps Tickets in chronological order.
Minimum Ticket Length – This dictates the minimum length of a POS Ticket.
It is usually preferred that tickets not be too small (as they will look 'odd' upon presentation).
This is often set to match the size of the folder used to present the Ticket to the Client.
Logo – This is a link to the image of the Logo that is to be printed at the head of the POS ticket.
Not all printers are capable of printing an image.
Please check with Abacus 21 to see if this will work with your printers.
Hard Copy – These are printers that use heavy (cardboard-like) paper preprinted forms (usually multi-ply).
Number of Lines Before Header – This is the number of lines that the program must advance the form before reaching the printable area. This is usually a preprinted Header or Logo area.
Number of Lines for Printing – This is the number of lines available for actual printing on the Ticket.
Add-on Printing – This allows for a previously printed Ticket to be re-inserted into the printer when additional Items have been added to the Ticket. The additional items will be printed at the end of the ticket rather than forcing the reprinting of the entire Ticket.
Double Width – For Future use.
Pre-Printed Form – This is for the printing of Pre-Printed Invoice forms in a Laser Printer and is for future use or customized use.