
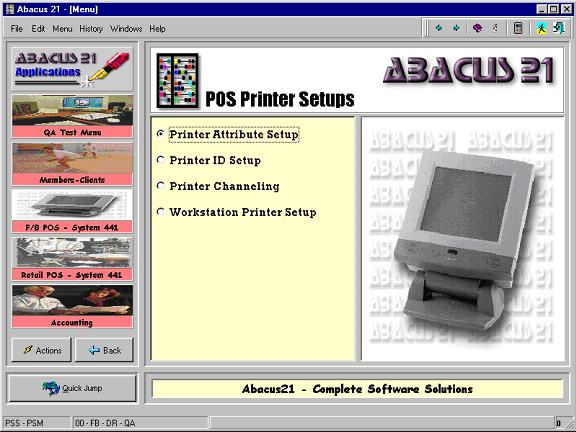
The configuration of Printers for Point-of-Sale must follow a sequence of steps:
Printer attributes defines hardware characteristics and interface settings. Minimally, an entry must be made for each Make and Model of printer that is used for either POS Tickets or Prep Chits. But if the same printer Make/Model is used in different areas where any of the information varies, a separate Printer Attribute must be created to identify the differences. Even if there is only a difference in the Logo to be printed or the size of a Hard Copy Ticket – this would require a separate Printer Attribute to be defined.
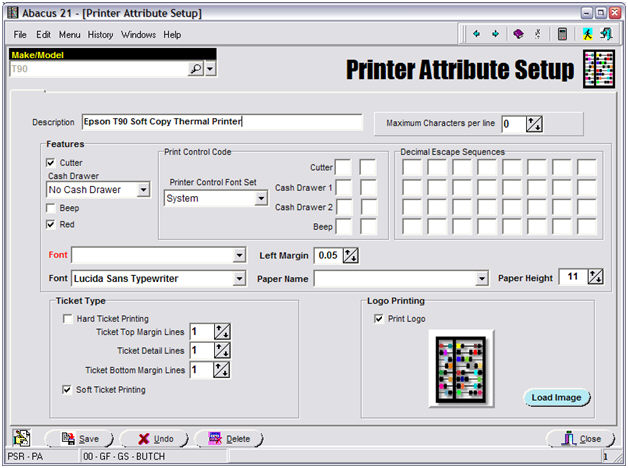
Make/Model –
Enter a Code for the Printer Attribute. Typically this is the familiar Code used to identify the Make/Model of the printer. But if the same model is used in different configurations you must expand upon this Code in order to differentiate these configurations.
Description – This Description will appear as dropdown options when a Printer Attribute is to be selected.
Maximum Characters per line – Based upon the specific Make/Model of printer and the font selection, the maximum number of characters that fix on the paper will vary. This setting lets you tell the system how many characters are available. You may have to do some tests to determine the proper settings.
Features – Here purchased features are identified as well as the controls for the printer.
Cutter – Check this box if the printer is equipped with a paper cutter.
Cash Drawer – Check this box if a cash drawer is attached directly to the printer.
Beep – If the printer is capable of sounding a tone – check this if the tone is to be sounded when a Prep Chit is printed. (This is particularly handy when thermal printers are used in a noisy environment like a kitchen - to make the staff aware that a Chit has been printed.)
Red – If the printer is equipped to print red as well as black – check this if modifiers are to be printed in red.
Font – Indicate the font available with the printer driver that is to be used for printing in black. (Check with Abacus 21 or the Abacus 21 Website for the recommended font for your printer.)
Left Margin – Some printers have a margin area where printing cannot appear. Indicate the amount of reserved margin area so the system will not print in this area. This may also require some testing or advice from Abacus 21.
Paper Name – The printer driver also is aware of various paper sizes. Select the one that is to be used when printing from Abacus. (Check with Abacus 21 or the Abacus 21 web site for the recommended font for your printer.)
Paper Height – This is normally set to 99.
See Also: System 441 Printer Driver Setup Document
Printer Control Code
Printer Control Font Set - Indicate the font available with the printer driver that is to be used for special control features. (Check with Abacus 21 or the Abacus 21 web site for the recommended font for your printer.)
Cutter – Enter the character(s) that cause the Control Font to activate the cutter – if a cutter is available on the printer. (Check with Abacus 21 or the Abacus 21 web site for the appropriate entry for your printer.)
Cash Drawer – Enter the character(s) that cause the Control Font to send a Pop-Cash-Drawer command to the printer – if a Cash Drawer is attached to the printer. (Check with Abacus 21 or the Abacus 21 web site for the appropriate entry for your printer.)
Beep – Enter the character(s) that cause the Control Font to activate the tone – if available on the printer. (Check with Abacus 21 or the Abacus 21 web site for the appropriate entry for your printer.)
Decimal Escape Sequences – These are not currently used. They are being held in reserve in case they are needed to control some printer in the future.
Ticket Type
Hard Ticket Printing – Check if a pre-printed hard copy ticket stock is to be used.
Ticket Top Margin Lines – Indicate how many lines must be skipped at the top of the form before the Ticket information can be printed. (This is the space for preprinted Ticket header information and/or logo.)
Ticket Detail Lines – How many lines of printable space is available on the ticket Stock.
Ticket Bottom Margin Lines - Indicate the number of lines that must be skipped at the bottom of the form.
Soft Ticket Printing – Check if soft roll paper stock is being used to print the Tickets.
Logo Printing
Print Logo – If you printer supports Logo Printing and you wish to have the system print a logo at the head of the Ticket, check this box.
Load Image – Press this button to identify the image that is to be used as the logo when POS Tickets are printed. The following window will be displayed to assist you in identifying the image. (The image must be in a similar location for all workstations that will be using this image as a logo. Either a similar location on the individual workstation – or a similarly mapped location on a server.)

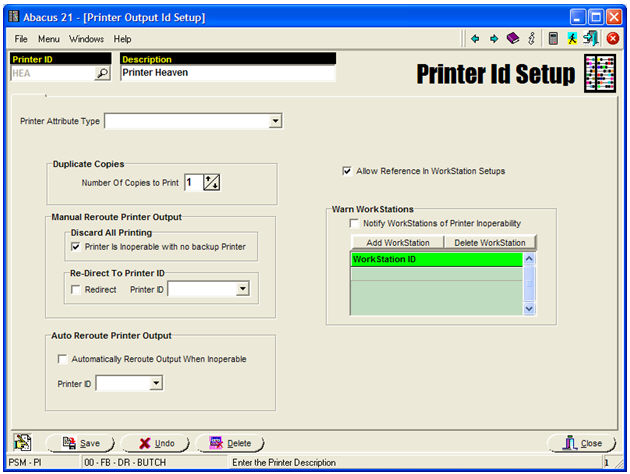
Printer ID’s are intended to represent specific physical printers – either on the network or local to a workstation. These printers may be used for either Ticket or Prep Chit printing.
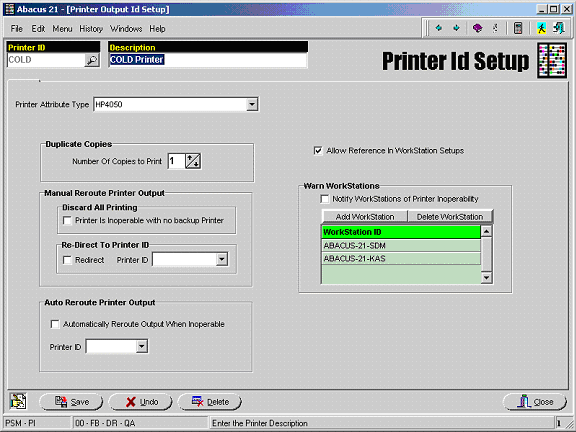
Printer Attribute Type – Identify the Printer Attribute (as defined in Printer Attribute Setup) that represents the printer’s Make/Model and option configuration.
Duplicate Copies -
Number of Copies to Print – Enter the number of copies of the POS Ticket that should be printed. If this is an impact printer, this would be set to 1.
If multiple copies were necessary, multi-part paper would be used.
If this is a thermal printer, multi-part paper is not an option so this setting allows you to instruct the system to print multiple individual copies.
This field is no longer functional. Control of this functionality has now been moved to the Ticket Printing Profile in POS Configuration.
Manual Re-Route Printer Output – Use of this functionality requires setting these flags at the actual time rerouting is necessary. When the printer is again available, the flags must be reset.
Discard All Printing – If the printer is inoperable and there is no reasonable printer where the output can be redirected – check this and the system will discard all printing that would normally be directed to this printer.
Redirect to Printer ID - If the printer is inoperable and there is a printer where the print output can be redirected – the system can be manually instructed to do so here.
Redirect – Check this box to cause the system to print to the identified Printer ID.
Printer ID – Identify the printer to which the print output should be redirected – another printer defined in this program.
Auto Re-Route Printer Output - If the printer is inoperable and there is a printer where the print output can be automatically redirected – the system can be instructed to do so here when the printer becomes inoperable. (This function is for future implementation.)
Automatically Reroute Output When Inoperable – Check this if the output is to be automatically rerouted when this printer is inoperable.
Printer ID – Identify the printer to which the print output should be redirected – another printer defined in this program.
Allow Reference in Workstation Setups – This is usually checked only for printers that are to be used for Ticket Printing.
Warn Workstations - For future use.
Situation:
When Iced Tea is ordered by itself, nothing gets fired (which is as it should be).
When a Club House Sandwich and Iced Tea is ordered, the Iced Tea Modifiers also get fired.
If a Clubh House Sandwich and Iced Tea is ordered, then it prints fine... but if any Modifier is added to the Club House Sandwich (like 'Do Not Make', 'Extra Mustard', etc.) then all the Modifiers for Iced Tea get printed as well.
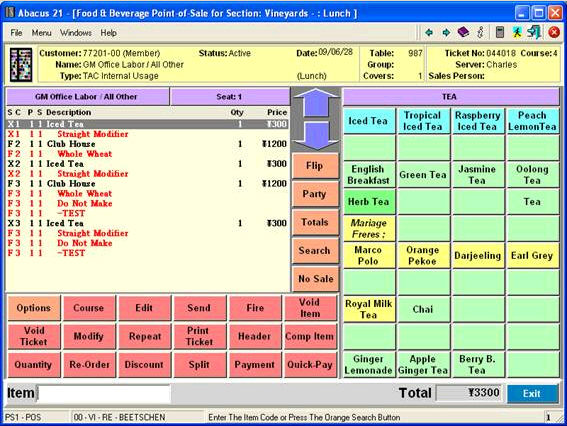
If you do not add the extra Modifiers (the "Do Not Make" and the "Test") the problem does not happen.
Also - if the Iced Tea has its own Printer Assignment, you do not get the problem either.
What some Users do is create a Printer called "Printer Heaven". It is a Printer Channel ID... but with no Printers assigned - so the Print Job goes nowhere - or to "Heaven".
If you assign this Item to the Iced Tea, you can also avoid the problem.
This is where Logical Printers are defined. These Logical printers are referenced in Item Setup as the Prep or Expedite Printer. These in turn reference Printer ID’s which represent physical printers.
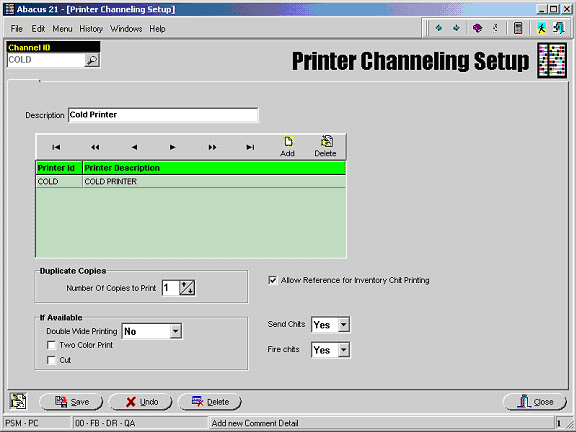
Description – Enter the Description for this Logical Printer. This Description will appear in dropdowns when a Printer Channeling ID is to be selected.
Printer ID – Identify the Printer(s) by their ID (as defined in Printer Id Setup) where Output to this Printer Channeling ID is to be directed. This can be one or more printer.
Duplicate Copies to Print - Enter the number of copies of the Chits that should be printed.
If this is an impact printer, this would be set to 1. If multiple copies were necessary, multi-part paper would be used.
If this is a thermal printer, multi-part paper is not an option so this setting allows you to instruct the system to print multiple individual copies.
If Available – These options are only used if the final printer where the output is directed supports these features.
Double Wide Printing – For Prep Chit Printing, a larger font may be available. The use of this Double Wide option is at the expense of the number of characters that may be printed on the chit. If the shorter descriptions are sufficient, the kitchen staff often appreciates the larger print.
Two Color Print – Check this if modifiers are to be printed in red - if this feature is available on the printer. Are other things printed in red?
Cut – Check this if the paper should be cut between chits – if this feature is available on the printer.
Allow Reference for Inventory Chit Printing – Check this if this Printer Channeling ID should be available in Item Setup for Prep or Expedite Printer reference.
Send Chits – Should Preview Chits be sent to this printer? Answer Yes or No.
Fire Chits – Should Fire Chits be sent to this printer? Answer Yes or No.
The Abacus software depends upon the Workstation’s Windows Printer definitions to route actual print output to the physical printers. Once the Printer ID’s and Printer Channelings have been set up, this program allows you to link the Printer Channeling definitions to the actual printers as established in Windows for a Workstation. This must be done at each individual workstation since you cannot identify the Windows printer names from a remote location.
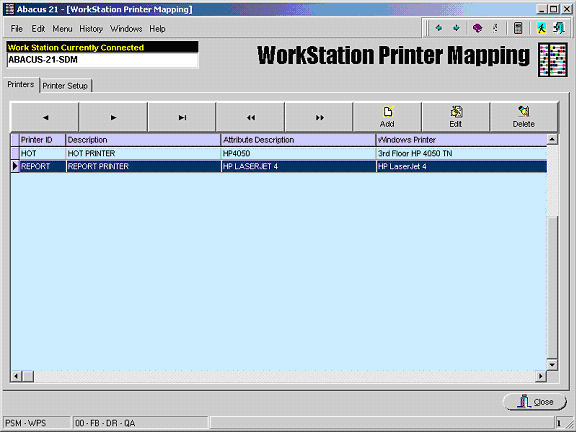
Upon entry into this program you are shown a list of the Printer ID’s that have already be linked to Windows Printers on this Workstation. You may Add new links... and Edit or Delete existing links.
When you Add or Edit, you are taken to the following screen where the link to a locally-defined Windows printer may be established:
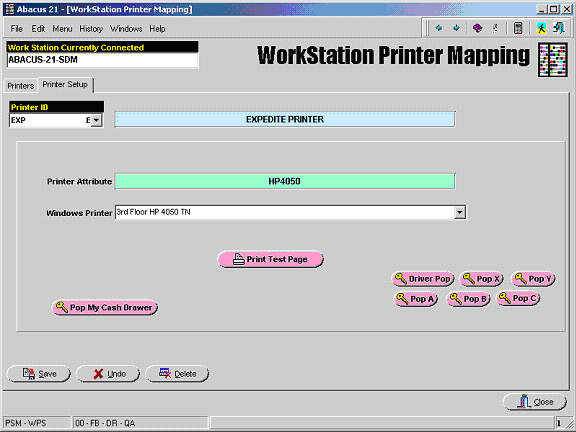
Printer ID – Select the Printer ID from the dropdown that you wish to link to a Windows Printer.
Windows Printer – Select the desired Windows Printer definition from the dropdown.
Print Test Page – Press this button to test printing to this printer through the Abacus Printer Definitions.
The other various buttons are to be used at the direction of Abacus personnel to test Cash Drawer Operation.