
Add-On's are User-defined mini-Databases that can be 'added onto' the Client for any number of User-define Topics.
The Add-On Databases are maintained/displayed as part of the right-side Client Options sidebar in Client Maintenance.
Add-On's can be used for anyone in the Client file: Prospects, Members, Other. (All Client Types utilize the same definitions of the respective Add-On's.)
Each Primary person and Individual person within the Client file can have his/her own personal responses to any of the Add-On Database.
Other User-defined Database styles available in Client Options are: CheckBox-Clickers, Alphanumeric-Clickers, and Series.
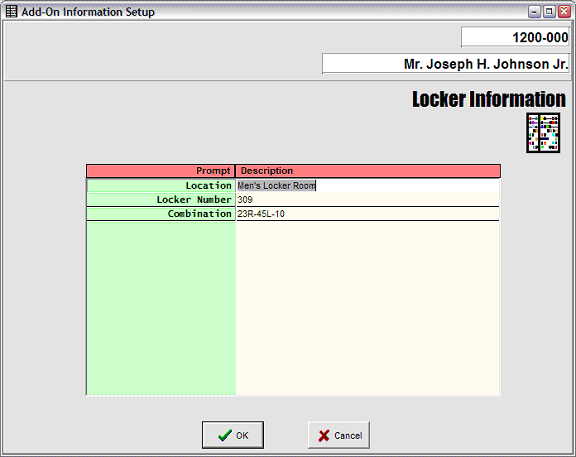
The screen below shows an example of a simple Add-On Database that was set up to track Locker Information -- namely, Locker Location, Locker Number, and Combination of the Locker:

Add-On Database Setups -
The screen below shows a list of Add-On Databases that have already been established by the User:

Add-On Database Setup - Main Screen:
The following screen shows how the name of the Add-On Database is created:

Add-On Database Category Code: Enter a Code (6-character max) for the Add-On Database.
Add-On Database Description: Enter a Description for the Database.
Screen Name: Enter a (short) Name for the Add-On Database.
This short Name will be used on the right-hand side Client Options display.
Add-On Database - Prompts:
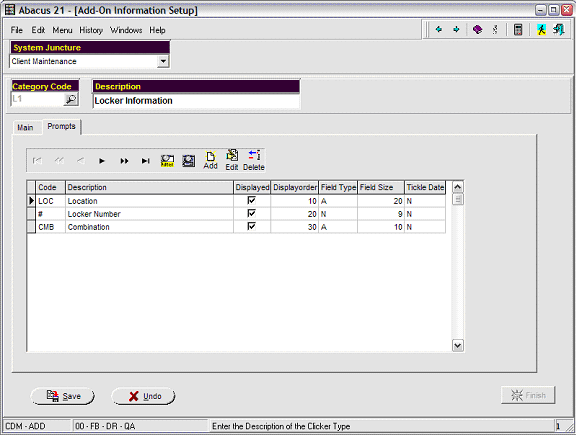
The screen below shows a list of Fields that the User has created within the L1 (Locker Information) Add-On Database:

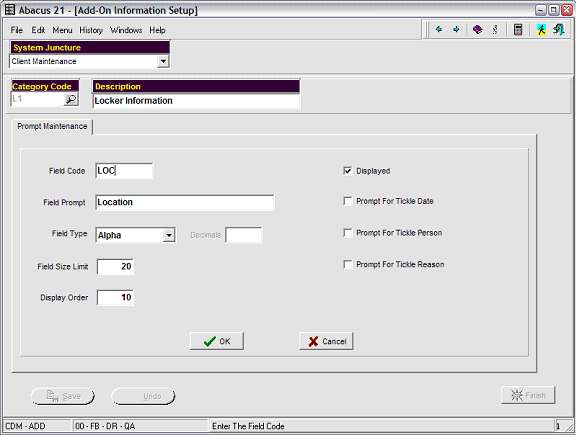
The following screen shows the set up requirements for a typical field (in this case Location) within the Add-On Database:

Field Code: Enter a Code for the Field (up to 6-characters max).
Field Prompt: Enter a Prompt (label) for the Field.
Field Type: Select a Field Type from the dropdown choices:
Alpha (Alphanumeric-Text)
Numeric
If the Field Type is Numeric, the User will be asked to specify the number of Decimals.
Field Size Limit: Enter the maximum number of characters allotted for the Field.
See Abacus 21 for details on maximum Field (and Record Size).
Display Order: Enter the 'sequence' order of the variables.
Notes on 'Display Order':
When creating Display Order sequence numbers, it is a good idea to leave 'gaps' in the sequence so that you can later do convenient 'inserts'.
For example, start numbering at 10 -- in jumps of ten -- 10, 20, 30, 40, 50, etc.
The 'Display Order' entered here positions the particular data element in a sequence (from top to bottom) down the Display Screen.
When establishing the 'Display Order' of any of these data elements, the sequence order will be determined by comparing the relative order of the Display Order Sequence Numbers of all 'active' data elements.
Any 'ties' will be broken alphabetically by Code.
Displayed: Check this box if the Field is to be 'displayed'.
Prompt for Tickle Date: Check this box if you want to imbed a Tickle Date with the records in this particular Add-On Database.
Prompt for Tickle Person: Check this box if you want to imbed a Tickle Person with the records in this particular Add-On Database.
Prompt for Tickle Reason: Check this box if you want to imbed a Tickle Reason with the records in this particular Add-On Database.
Contact Abacus 21 for information about Abacus 21's Tickler System.