This section provides an illustration of how to Create, Print, and Receive a Purchase Order (ie. PO-Processing)-- and will utilize a Food/Beverage Purchasing example.
Selecting the PO Processing Menu Option:
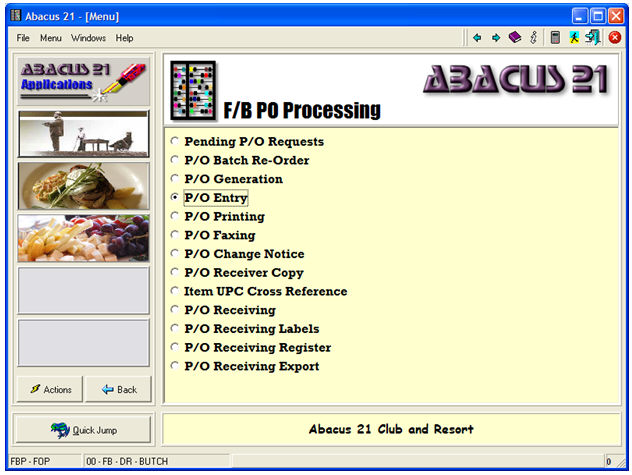
... and going directly to P/O-Entry (by-passing for this example some automated procedures for doing P/O's):
The following description illustrates how to create-edit a Purchase Order -- and the procedure follows the sequence of:
Creating a New Inventory Item from within Purchase Order Line Entry
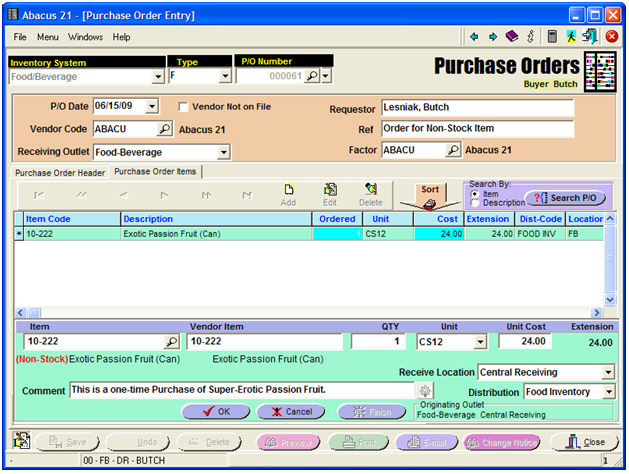
Ordering a Non-Stock Item from within Purchase Order Line Entry
Creating a Purveyor-Vendor Contract from within Purchase Order Line Entry
Enter a valid Purchasing Buyer Staff-ID:
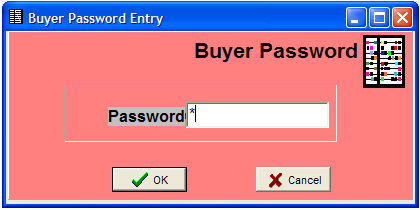
Buyer specific Passwords are set up under Staff-Passwords.
Purchase Orders are associated with 'Outlets' (as opposed to Sections) -- as default-affiliated with a particular Inventory System.
See the following pertinent setups within Company Setup:
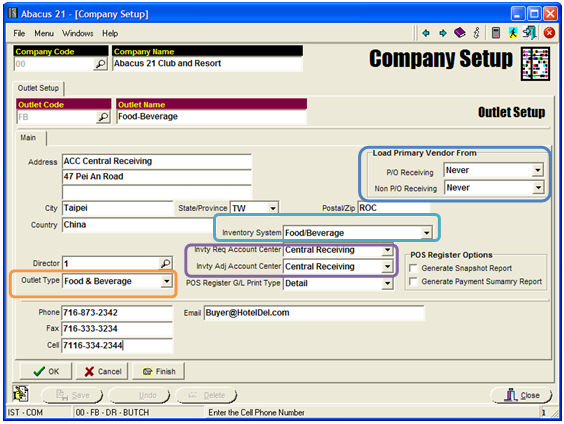
Note the following sections that are directly pertinent to Purchasing:
The Company is '00' -- Abacus 21 Club and Resort
The Outlet is 'FB' -- Food-Beverage (in general)
The Address is that which will be used as the default Ship-To Address of any Purchase Order. (In subsequent aspects of the example, the Country has been changed from China to USA.)
The Phone, Fax, Cell, and Email are used within Purchasing.
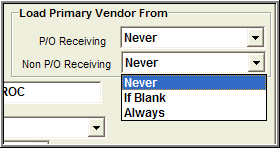
The blue-highlighted 'Load Primary Vendor From' segment defines to the Purchase System when to Load 'stuff' the 'Primary-Vendor' field of an Item by either 'P/O-Receiving' (the formal Purchase Order Receiving System) or via 'Non-P/O Receiving' (the informal method available within Inventory Management.
Primary Vendor is the "principal" Vendor-Purveyor that is to be associated with the Item (for certain Vendor-Purveyor reports)... acknowledging for the fact that any particular Item can be procured from possibly multiple Vendors-Purveyors now... or over time.
When a single-Vendor concept is needed to facilitate analysis-reporting, it is the 'Primary Vendor' that is used (as opposed to the potential varying cast of Vendors that may be involved currently or over time).
The choices for these Options are:
Never
If Blank (only if the prevailing Primary Vendor is Blank)
Always
The turquoise-highlighted 'Inventory System' segment asks you to select the default Inventory-System for this Outlet's Purchase Orders.
The purple-highlighted [which is not directly pertinent to Purchasing -- but are described here for distinction purposes] segment determines the default Account Centers (Sections) for:
Inventory Requisitions
Inventory Adjustments
The orange-highlighted segment defines the 'Type' that the Outlet is to be consider to operate as.
Create (or Search-for & Recall) of a Purchase Order -
This Example illustrates creation of a 'New' Purchase Order.
Note that since a User's Sign-In determines a particular Company-Outlet-Section, the Purchase Order Entry program adopts the Inventory System default associated with that Company-Outlet... and adopts the P/O-Type default & Receiving-Outlet default as defined in the P/O-Control Setup for the Inventory System.
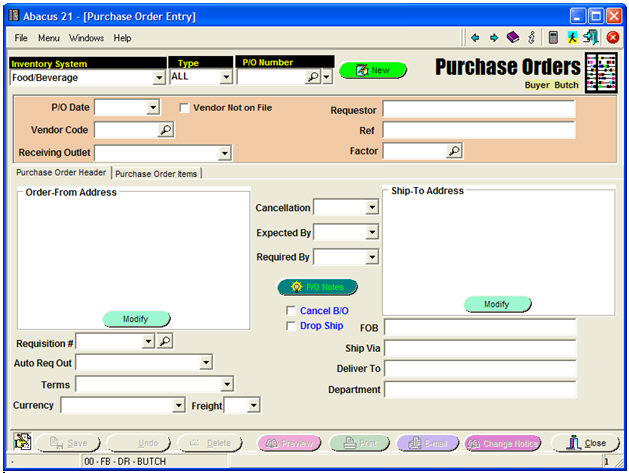
Notice the 'Buyer' Name in the upper-right.
At this point, you can hit the 'Magnifying Glass' P/O-Number full-Search button (to see all non-Registered P/O's):
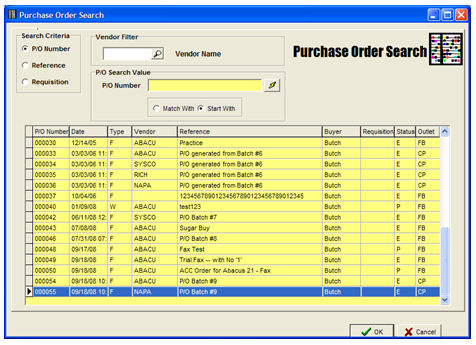
... or, you can hit the P/O-Number dropdown arrow (for a more-abbreviated search):

... or hit the green 'New'  Button to create a 'New'
Purchase Order:
Button to create a 'New'
Purchase Order:
Of course, you can go back and change the Inventory-System and/or P/O-Type from their defaults if desired.
The P/O-Date defaults to the current Date... but can be overridden.
The Requestor field is filled in with the Buyer's Name... but can be overridden (and is free-form text -- with no validation)
The Receiving Outlet is initially set to the Profile's Company-Outlet's default Outlet... but can be overridden.
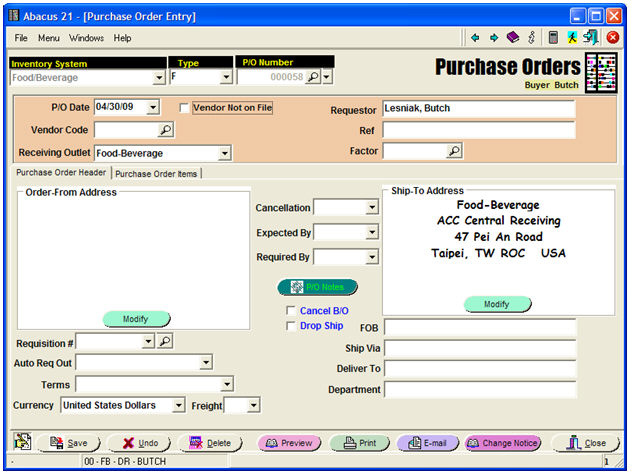
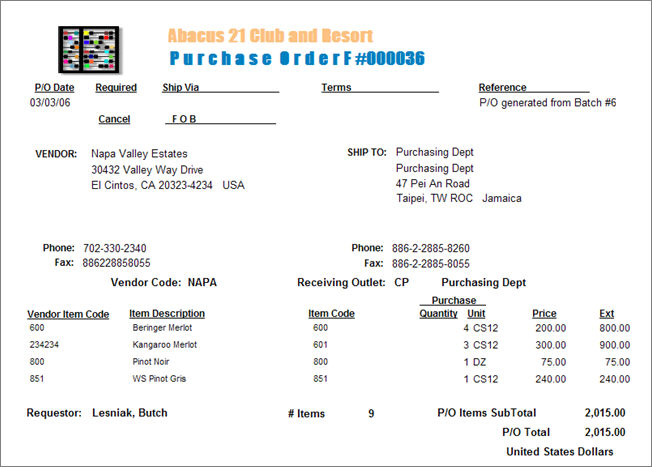
Below is an example of a Purchase Order Header after it was created:
As mentioned above, Purchase Orders (as well as Inventory Transactions and Point-of-Sale Transactions) are all done within a particular Inventory System.
Note: Transactions for Inventory-Purchasing-POS can not cross Inventory Systems.
Inventory System - Select an appropriate Inventory System.
Type - Select the P/O-Type that the Order is to be affiliated with.
P/O-Number - For new P/O's, this will be automatically assigned the next P/O-No in the Inventory Systems' P/O Type sequence. (See P/O Type Setup.)
For recalled Purchase Order, you either enter an existing P/O-Number... or do one of the two Searches described above.
P/O Date - Enter the Date you want attached to the Purchase Order.
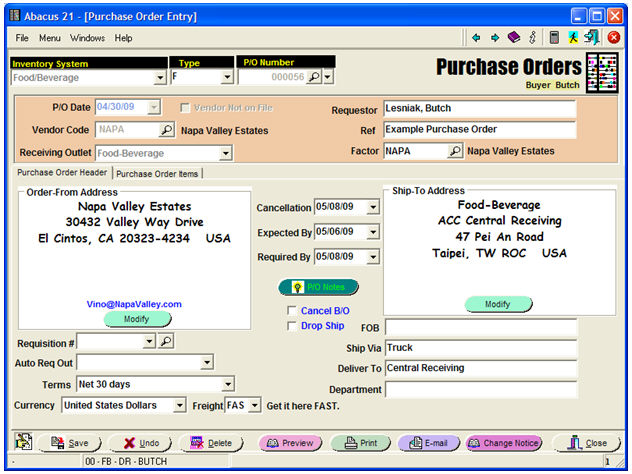
Vendor Code - Enter a valid Vendor-Purveyor Code... or do a Search for one.
If 'Vendor-Not-On-File' is allowed (see P/O Control) and this box is 'checked' for this P/O by the Buyer, you will be presented the following screen:
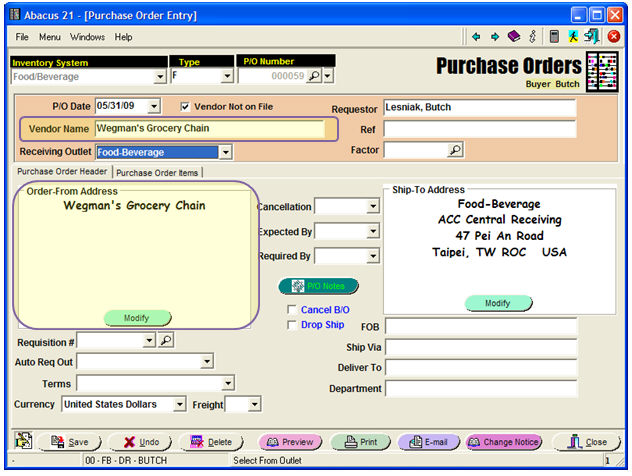
Notice (see the purple-highlights) that a 'Vendor Name' field is presented under the P/O-Date.... and, once that is filled in (with the Not-On-File Vendor's Name), that Name defaults into the Order-From Address section of the entry screen.
It most-likely would then be appropriate to elaborate on the Non-Vendor's Address -- by hitting the green 'Modify' button:
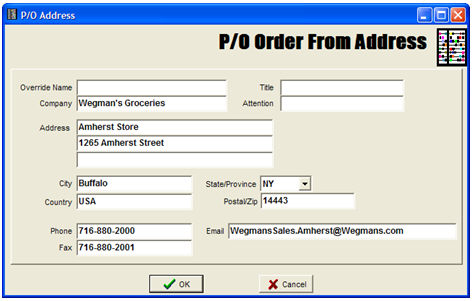
Note that the Company Name (in this example) has been changed a bit... just to illustrate that it can be done.
Note furthermore, that Vendors that are utilized under the Not-On-File context are NOT retained in the Vendor file... and therefore do not appear in all History, 1099, and Reporting facets. Consequently, discretion should be exercised with respect to "casually" using the 'Not-On-File' feature in lieu of formally setting these up as true Vendors or Purveyors.
Note also that this 'Modify' Order-From Address button works similarly for being able to change a normal Vendor's Address information -- for this particular P/O only.
This results in the following Non-Vendor related P/O Entry Screen at this point:
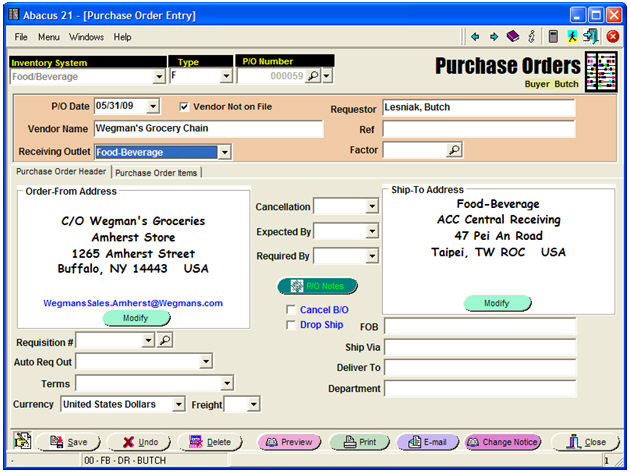
Now... back to the original Vendor-Related Purchase Order Example...
Receiving Outlet - The default can be changed to any other legitimate Outlet set up for the User's Profile (for the Profile's Company) for the designated Inventory System.
Requestor - The default (the Buyer) can be changed to anything (free-format, non-validated).
Factor - Factor is 'who gets paid' -- as opposed to who you 'ordered' from (Vendor-Purveryor) or who 'made' the Item (Manufacturer).
In some cases, Manufacturer-Vendor-Factor are one in the same -- or two-out-of-three are the same.
Accounts Payable normally only pays Business Entities that are declared to be 'Factors' as one of their attributes.
Factor defaults to the Vendor-Purveyor noted... if that Vendor-Purveyor is recognized as a 'Factor'.
Order-From Address -
For a Vendor On-File, the Address information is displayed... and can be changed (for this P/O only) by hitting the 'Modify' button (see above).
For a Vendor Not-On-File, the Vendor Name is filled in... but any other Address information would need to be entered via the 'Modify' button (see above).
Ship-To Address -
This defaults to the Address of the Receiving Outlet... but can be changed by hitting the 'Modify' button (similar to the Order-From Address).
Cancellation (Date) - Enter the Date that the Order is to be consider 'Cancelled' if it has not yet been delivered. Appears on the Purchase Order. Further future uses anticipated. Optional.
Expected By (Date) - Enter the Date the Order is expected to be delivered. Further future uses anticipated. Optional.
Required By (Date) - Enter the Date that the Order is 'required by'. Appears on the Purchase Order. Optional.
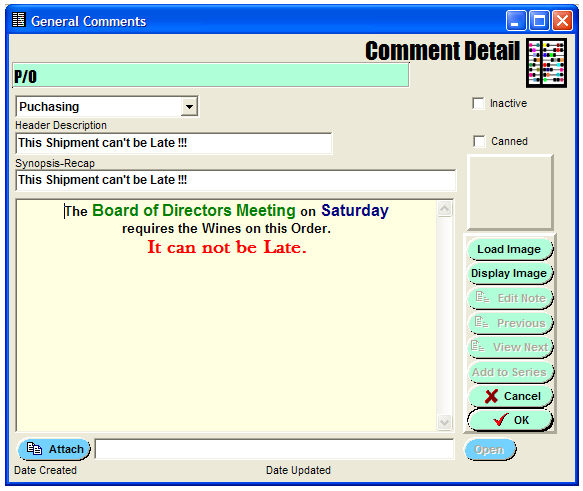
P/O Notes - Allows the entry of P/O-Header Notes (which appear on the Purchase Order)... done via the Comment-Narrative Routine. Optional.
Application: Purchasing
Junction: Purchase Order Header
Cancel B/O - Select this checkbox if you want an Partial receipts to default their BackOrder Quantity to 0. Optional.
Drop Ship - Select his checkbox if you want the shipment of this Purchase Order to be dropped shipped.
Requisition # - Select from the dropdown or search from any existing Requisition if this P/O is to be associated that particular Requisition. Optional.
Auto Requisition Outlet - Select a destination Outlet if you want the system to automatically create a Requisition from the Receiving Outlet to the destination Outlet (when the Order is received). Optional.
Terms - Select the appropriate Payment Terms. (Defaults to the Vendor's default Payment Terms that were establish in Vendor-Factor Maintenance.) Optional.
Currency - Select the appropriate Currency. (Defaults to the Vendor's default Currency that was established in Vendor-Factor Maintenance.) Optional.
Freight - Select the appropriate pre-defined Freight Message. Optional.
FOB - Enter a short Freight-on-Board Message (to be printed on the Purchase Order) if desired. Optional.
Ship Via - Enter a short description (to be printed on the Purchase Order) if desired. Optional.
Department - Enter any Departmental routing information (to be printed on the Purchase Order) if desired. Optional.
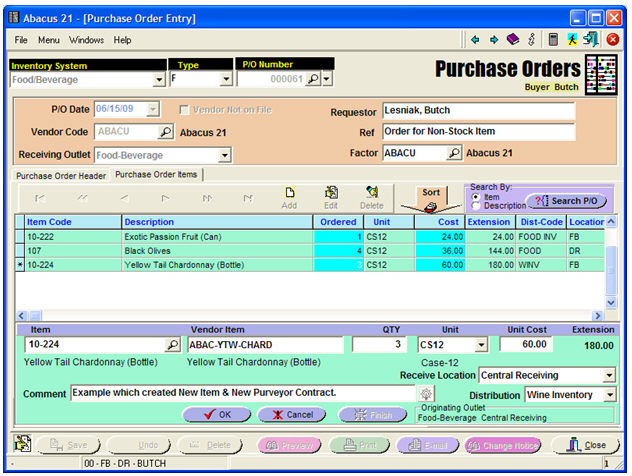
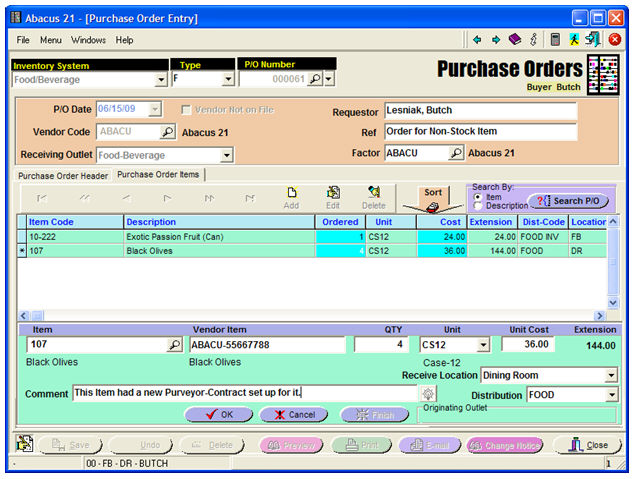
The information regarding the Items to be ordered is entered here:
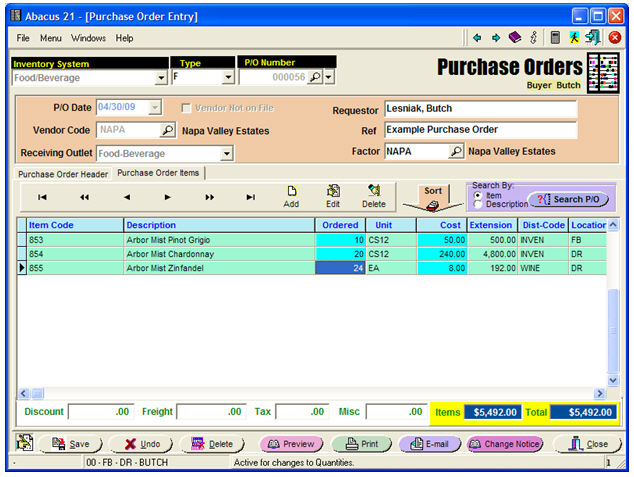
The above example has three Items already entered.
Hit the 'Add' Button to add Items to the Order.
Hit the 'Edit' Button to edit the line-item that is highlighted.
Hit the 'Delete' Button to delete the highlighted line-item.
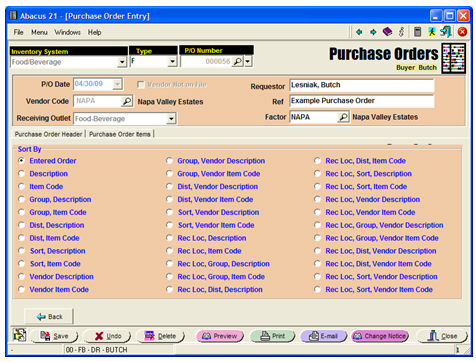
Sort - Sorts the display of the P/O's line-items by a variety of alternatives:
Search By - Searches the P/O by either Item-Code or Item Description.
The Grid of Line-Items displays:
Item-Code, Item-Description, Ordered-Qty, Unit (of order), Cost (of Unit), Extension (of Ordered-Qty times Cost), Distribution-Code (relative to the Purchases and Inventory Accounts), Location (within the Receiving Outlet... for the Items to be received into).
And... off to the right-side (use the Slider): On-Hand Qty, Vendor-Item-Code, Vendor-Item-Description, Inventory-Group, Item-Sort-Field, Purchase-Unit, Base-Unit, Weighted Average Cost, Weighted Average Cost Date, Requisitioning-Outlet, Requisitioning-Location.
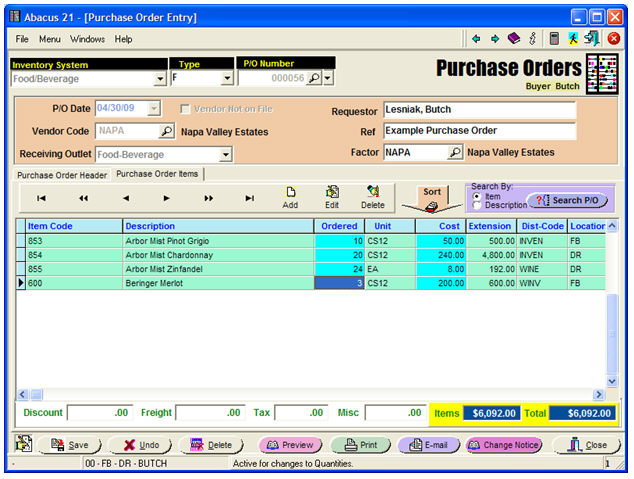
The Footer of the Line-Item Screen displays the following Dollar-Amounts:
Discount - Entered by hand. Optional.
Freight - Entered by hand. Optional.
Tax - Entered by hand. Optional.
Miscellaneous (Fees) - Entered by hand. Optional.
Items (Total) - Displays the running Total of all the Line-Items.
Total (Total) - Displays the running Total of the Line-Items plus the Discount, Freight, Tax, and Miscellaneous Amounts.
The Footer of the Purchase Order Screen contains the following Buttons:
Save - Saves Purchase Order.
Undo - Undoes the changes to the Purchase Order.
Delete - Deletes the Purchase Order.
Preview - Shows a Preview (on Screen) of the Purchase Order.
Print - Prints the Purchase Order.
Email - Spawns an Email of the Purchase Order (if properly configured).
Change Notice - Prints a Change-Notice of the Purchase Order (required if the Order has been 'changed').
Close - Closes the Purchase Order Screen.
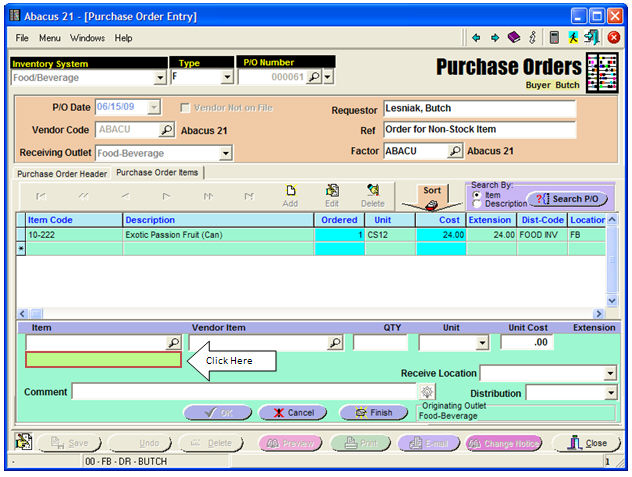
The Line-Item Entry Screen looks like this for a new Item 'Add':
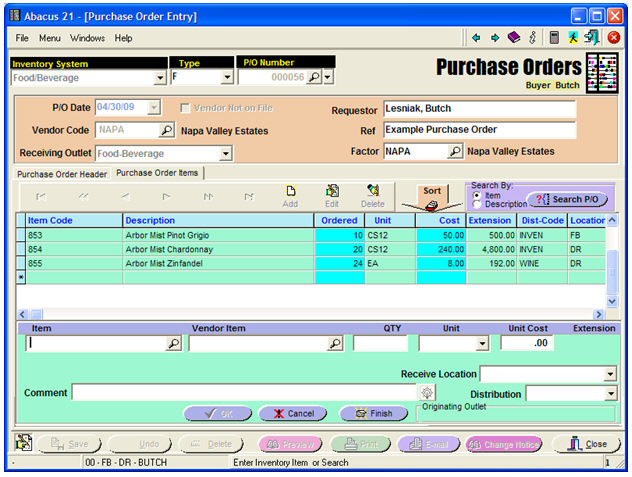
Item-Code - Enter an existing Item-Code, Search for an existing Item, or (if the Non-Stock Item feature is turned on) enter a non-existing Item-Code.
Here is an example of the Item-Search:
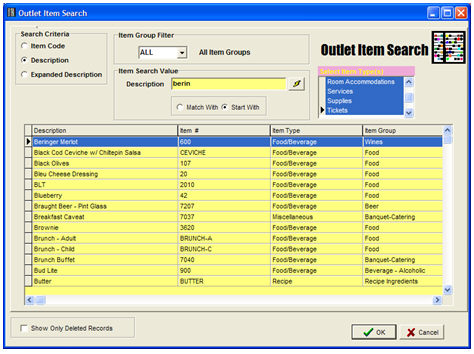
Search Criteria: by Item-Code, Description (the default) or Expanded Description
Item Group Filter: All or Selected Inventory-Item Groups
Item Type(s) Filter: All or Selected Item Types
or... Hitting the Search Button at the right-end of the Vendor-Item input field will allow you to search by Vendor-Item terminology (instead of your Property's terminology for Items):

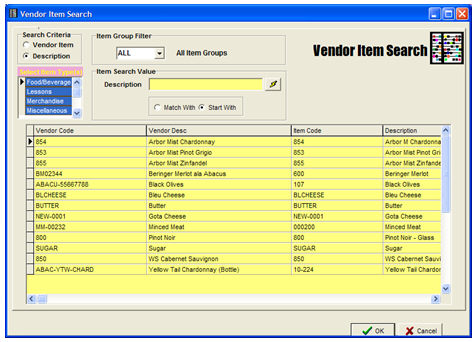
Either way... select an Item... ... and an existing Item called up and to be Ordered.
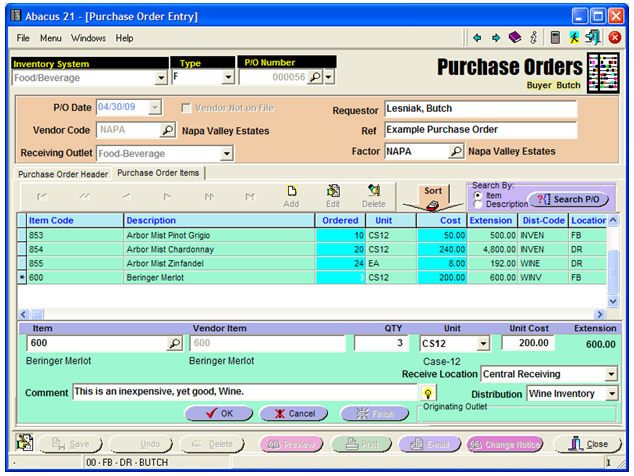
The associated item-Description is displayed beneath the Item-Code.
Vendor Item - Displays the Vendor's Item-Code (for your Item).
The associated Vendor-item-Description is displayed beneath the Vendor-Item-Code.
Quantity - Enter the Quantity to be Ordered.
Unit - Displays the default Purchase Unit (and Unit Description) -- allowing changes.
Unit Cost - Shows the Unit Cost (if known from a Purveyor-Vendor Contract)... or allows Entry-Change.
Extension - Displays the Extension-Amount (Quantity times Cost).
Receive Location - Defaults to the default Location associated with the P/O's Outlet... but can be changed to any other Location associated with the Outlet.
Distribution Code - Defaults to the default Distribution-Code for that Item at that Outlet-Location -- thus implies the Purchasing and Inventory G/L Accounts. Can be changed.
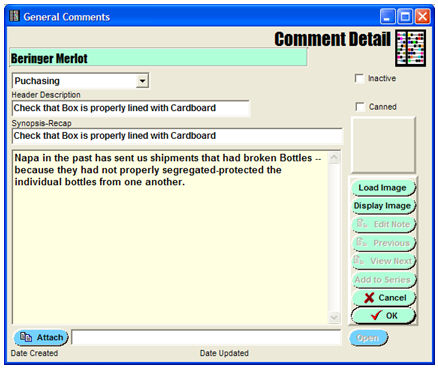
Comment - Allows for entry of a single-line Comment (regarding the line item) -- intended to be printed on the P/O.
Comment-Narrative Button - Allows for entry of a full-narrative (regarding the line item) -- also intended to be printed on the P/O.
Application: Purchasing
Junction: Purchase Order Detail
Originating Outlet - Displays the originating Outlet & Section Names.

The Screen below shows the result of having added the fourth Item:
Hitting the 'Preview' Button:
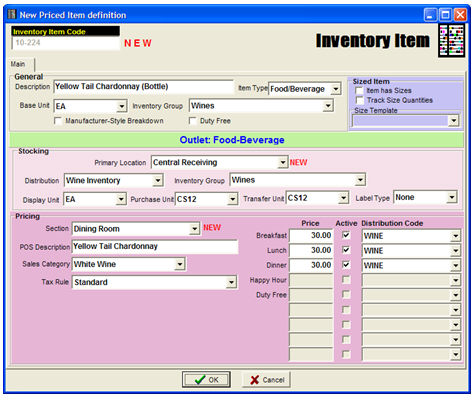
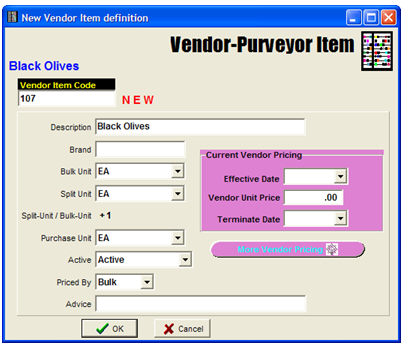
Creating an Inventory Item from within Purchase Order Entry -
You can create a new Item in Inventory on-the-fly right from within Purchase Order Entry.
To initiate this action, right-click on the blank Item-Code field (and choose the 'Set Up New Item' option) or the space beneath the Item Description field:
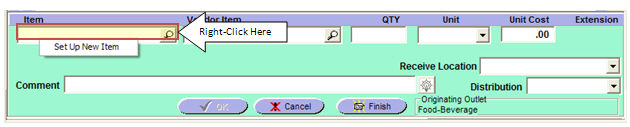
This action invokes the following Item-Creation form:
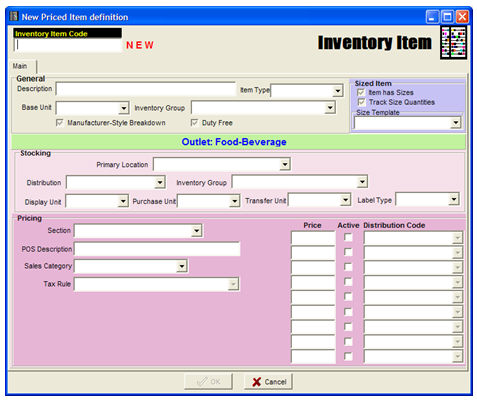
Fill in the fields as appropriate:
Note that this feature can create both the Inventory aspects of an Item... as well as the Point-of-Sale elements (if the Item is also 'sold').
In this example, it is being created as an Inventory Item in both Central Receiving and the Dining Room. Additionally, it is being set up as a Point-of-Sale Item in the Dining Room.
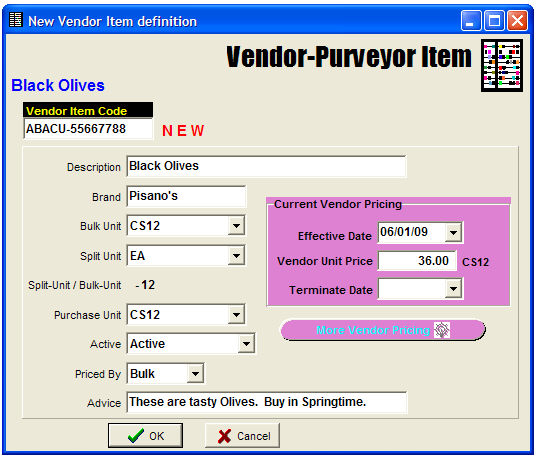
And, if the Purveyor-Vendor Contract doesn't exist, the program automatically prompts you to see if you want to create one for this new Item:
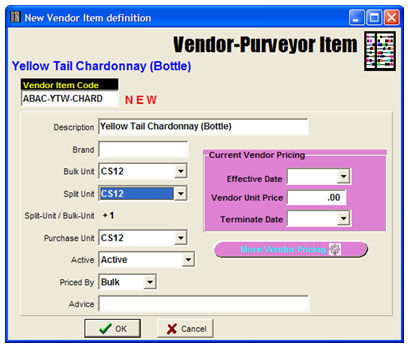
... which you can modify appropriately:
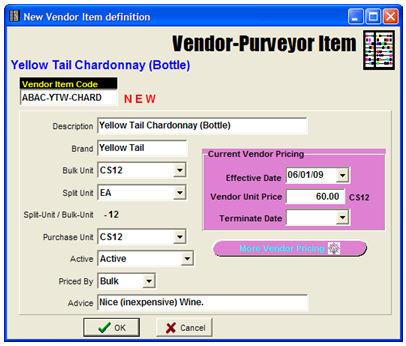
Resulting in the following Line-Item (filling in the remaining fields):
If the P/O Control is set to allow the creation of Non-Stock Items (on a P/O), the entry of an Item-Code that does not exist will illicit the following message prompt:
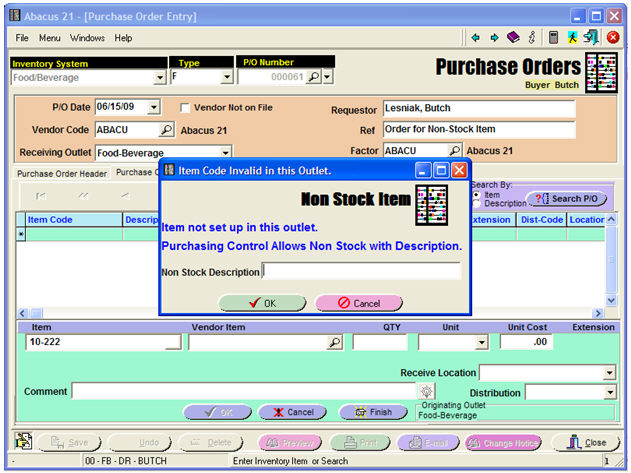
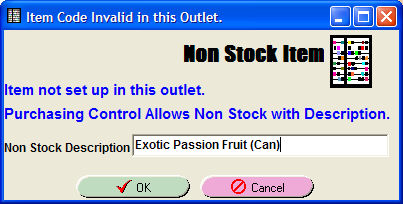
If you truly want to create a new Non-Stock Item (ie, not in Inventory) to be associated with this Item-Code for the occasion of this Purchase Order, enter a Description for the Non-Stock Item... and hit 'OK'. Otherwise, if your entry was a mistake, hit 'Cancel'.
Fill in the other pertinent fields for this Item:
Creating a Purveyor-Vendor Contract from within P/O Entry -
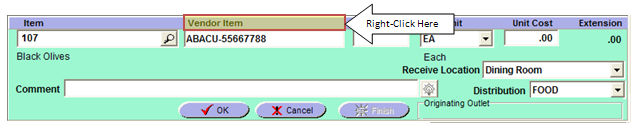
You can view, edit, and/or create a Purveyor-Vendor Contract for an Inventory Item right from within P/O Entry.
To invoke this feature, right-click on the Vendor-Item Header:
Doing so will pop up the following form:
Fill in as pertinent:
... and complete the Order for that Line-Item:
Other Purchasing System Processes -
Once the Purchase Order has been created, the following sequence is typical:
See below for details...
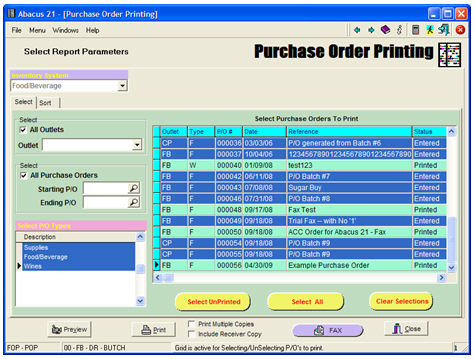
Hitting the P/O 'Print' Button gives the following choices:
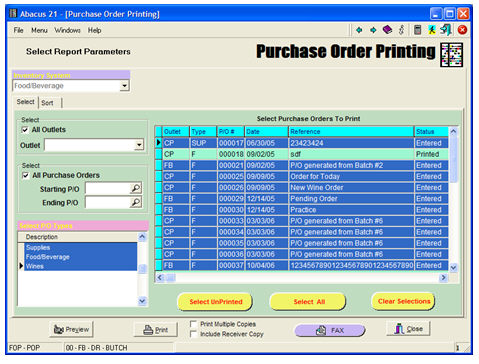
Inventory System - Select the appropriate Inventory System.
Select Tab -
All Outlets - This checkbox implies 'All' Outlets will be considered in Printing. De-Selecting it allows you to pick a single Outlet.
All Purchase Orders - This checkbox implies 'All' Purchase Orders (Numbers) will be considered in Printing. De-Selecting it allows you to pick a P/O Starting-Ending No. Range.
Select P/O Types - This selection grid allows you to pick one or more P/O Types to be considered in Printing. (Double-Click to Select or De-Select... or Control-Click to Select or De-Select multiples.)
Select Orders to Print - This selection grid allows you to pick one or more P/O's to be considered for Printing. (Double-Click to Select or De-Select... or Control-Click to Select or De-Select multiples.)
You can also use the 'Select UnPrinted' Button to only give those P/O which have not yet been printed.
You can use the 'Select All' Button to select all P/O's... or the 'Clear Selections' Button to de-Selection any selected P/O's (to start again).
The darker blue color relates to the Selected elements.
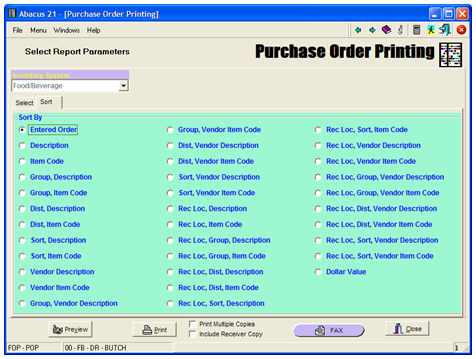
Sort Tab -
Allows the User to determine the 'sort order' under with the Purchase Orders will be printed:
Footer Controls -
Preview - This Button allow a 'Preview' (to the Screen) of the P/O's that are to be printed.
Print - This Button 'Prints' the Purchase Orders.
Print Multiple Copies - Prompts for the number of copies to Print).
Include the Receiver Copy - if checked, also prints a Receiver Copy (along with the P/O itself).
Fax - routes the Purchase Order to Abacus 21's eFax Interface (sold separately).
Close - Closes the P/O Print program.
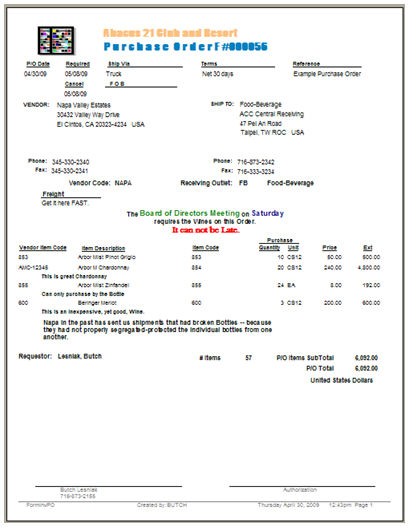
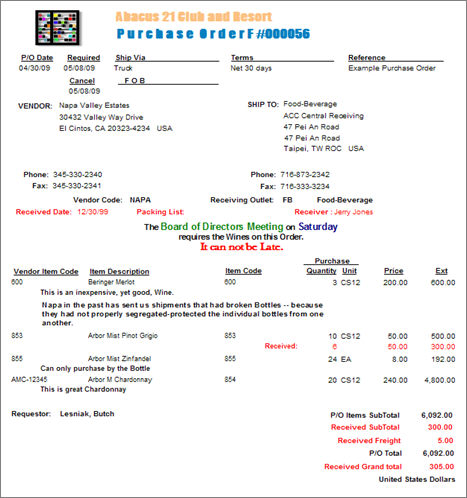
Example Purchase Orders (using one of the multiple Standard Formats):
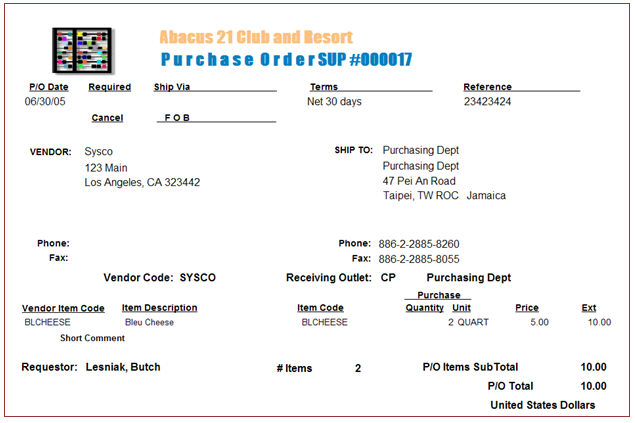
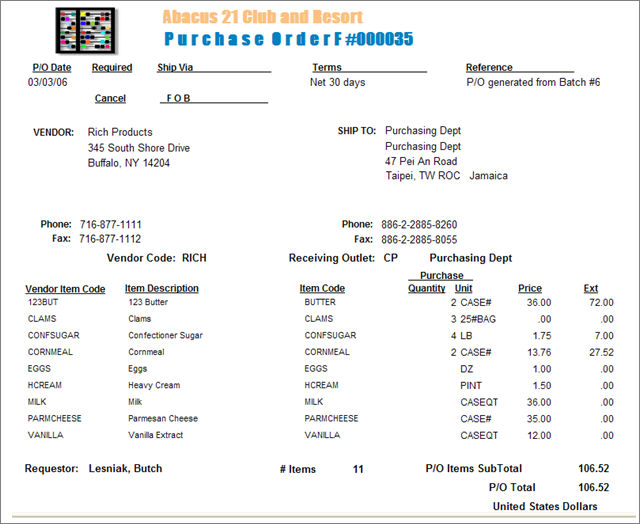

Including our 'example' from above...
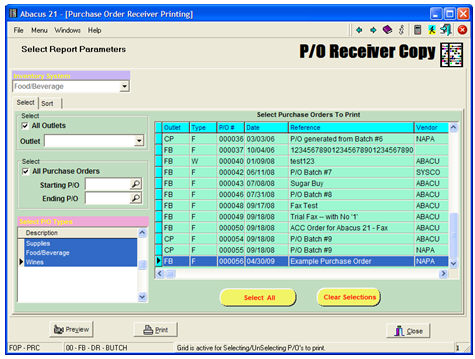
Using the P/O Receiver Copy Menu Option, you get similar selectivity:
And... an example of the actual Receiver Copy (one of the Standard Formats):
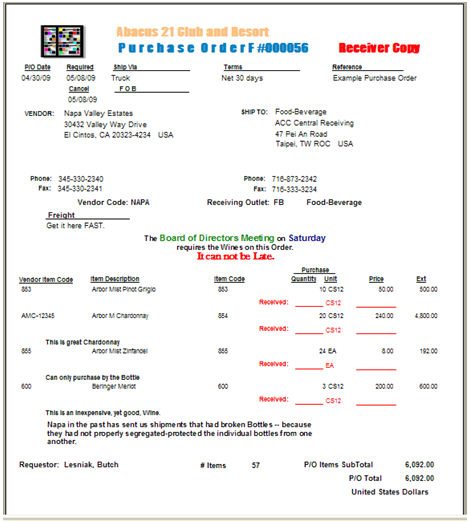
Note the provision for the Received Quantities (and Costs) to be entered.
Oftentimes only "differences' from what was Ordered are entered.
Also, sometimes the Receiver Copies are printed "Blind" -- without an indication of 'Ordered Quantities' and/or 'Costs'.
Some Clients use a 'copy' of the original Purchase Order to 'receive against'.
Once the P/O-Receiving Documents have been printed (or recalled from file) they can be used to acknowledge the actual Received Quantities and Costs.
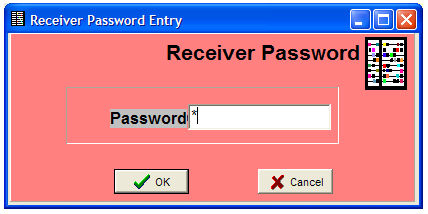
Enter an appropriate Receiver Password:
Enter (or search for) a particular Purchase Order to Receive via the Dropdown-Search:
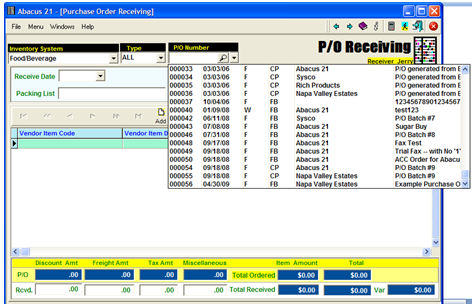
... or via the full Search:
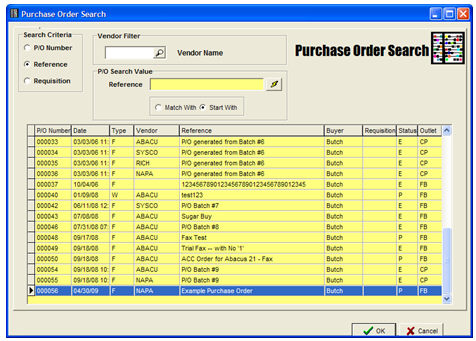
You can search by P/O-Number, Reference, or (associated) Requisition-No... and filter by Vendor.
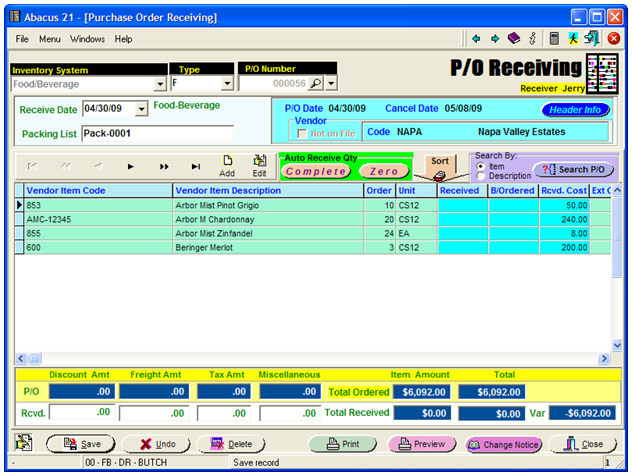
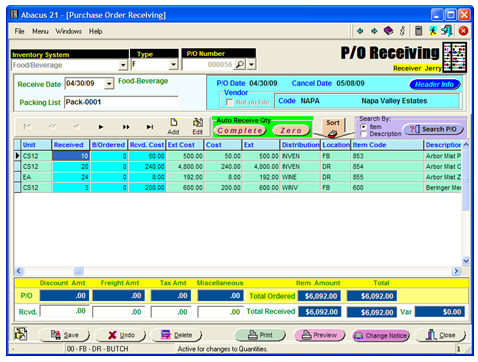
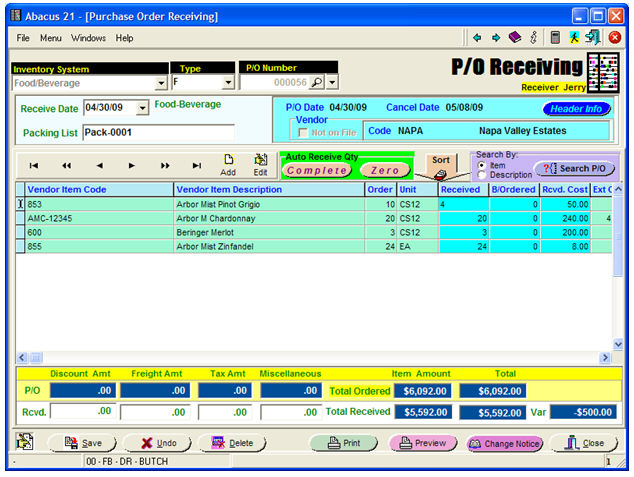
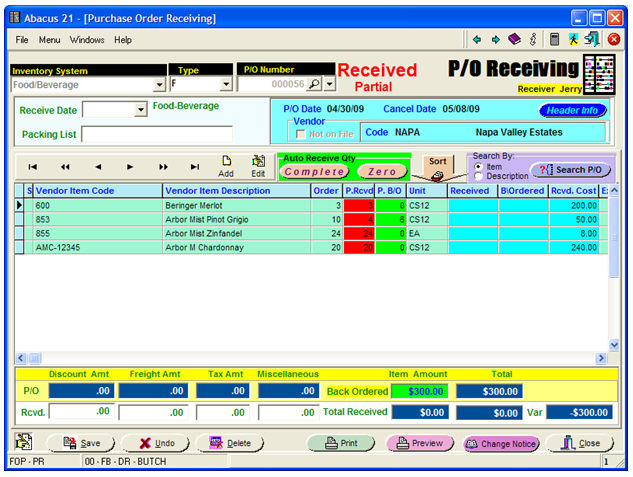
This will invoke the Receiving Screen (for our example P/O #F-000056):
Receive Date - Enter the Receive Date. Required.
Packing List - Enter any Packing List Information if desired. Optional.
Header -
P/O Date is displayed.
P/O Cancel Date is displayed.
Vendor 'Not-on-File' Indicator is filled in if Vendor is "not on file" -- a Non-Vendor.
Vendor Code and Name are displayed.
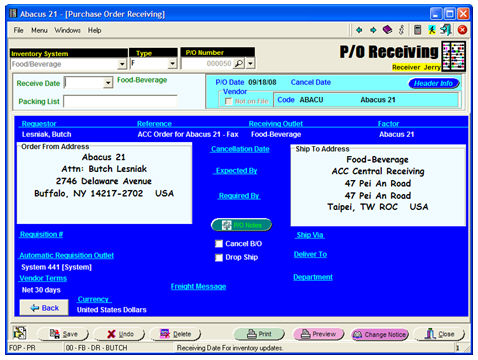
Header Info Button - Display all the Header Information (this example from a different P/O):
Footer -
(Original) P/O Information: Displays the P/O's original Amounts for Discount, Freight, Tax, Miscellanous, Items-Total, Total-Total (inclusive of everything).
Received P/O Information: Displays the P/O's received Amounts for Discount, Freight, Tax, Miscellanous, Items-Total, Total-Total (inclusive of everything).
Variance: The Total Dollar Difference between the Purchase Order (original in this case) and the Total Dollar Amount implied by what was Received.
Footer Controls -
Save - Saves the Receiving info for this P/O.
Undo - Undoes the Receiving info for this P/O.
Delete - Deletes the Receiving Info for this P/O.
Print - Prints the Receiver (inclusive of the entered Receipts) for this P/O.
Preview - Shows the Receiver (inclusive of the entered Receipts) for this P/O on the Screen.
Change Notice - Prints the Change-Notice for this P/O.
Close - Closes the Receiving Application.
Auto Receive Quantity -
'Received Quantities' can be individually entered/changed by hand... or
Hit the 'Complete' Button to default all the Received Quantities to the Amount(s) that were Ordered.
This is useful when the Order is basically "complete"... with perhaps only an exception or two.
Hit the 'Zero' Button to default all the Received Quantities to Zero (0).
This become useful when only an Item or two of a many-Item Order has been received.
Note: Any of the resultant Quantities can later be changed.
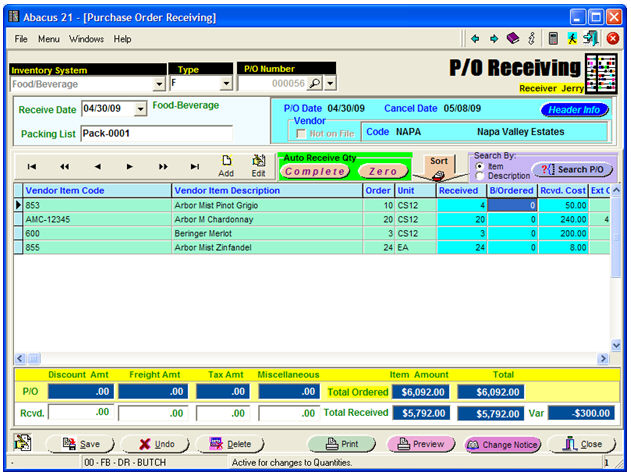
BackOrdered Quantity -
If the Quantity-Received is different (most-likely less) than the Quantity-Ordered, the BackOrdered-Quantity fills in with the difference -- that is, becomes a Partially-Received Order (allowing BackOrders) -- unless, the Default BackOrder Flag control has been set to Default to Zero ("Fill-or-Kill") and restricts Partial-Orders.
Received Cost - Defaults to the Ordered-Cost... but can be overridden.
Extended Cost - Displays the Extended Cost (Received Qty times Received Cost) Amount.
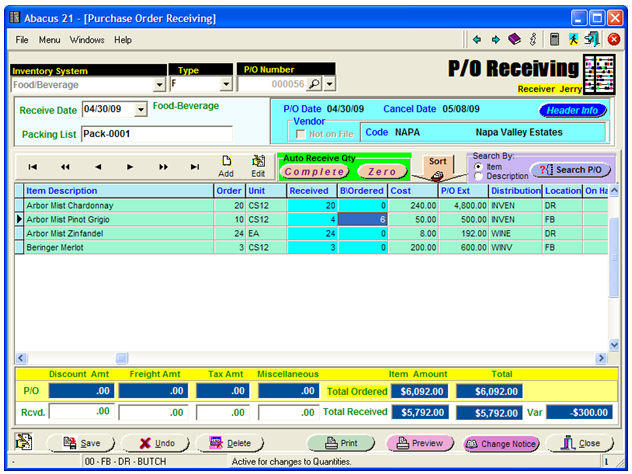
Other Columns of Information (viewed by moving the Slider to the right):
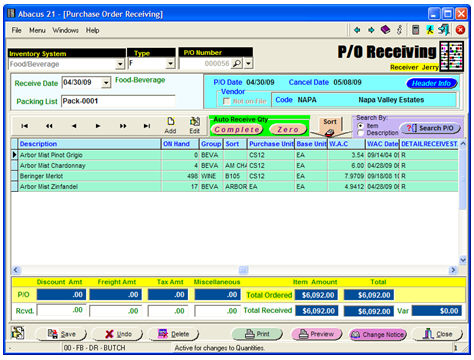
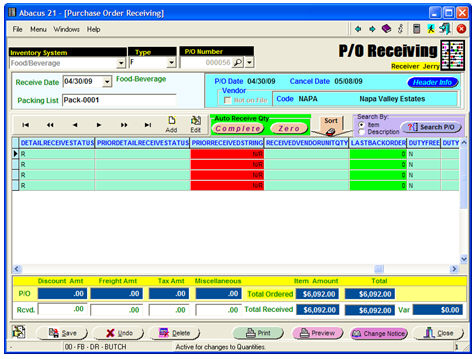
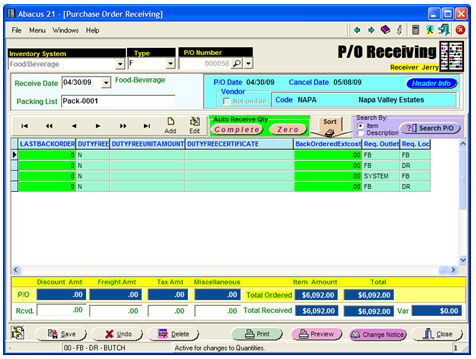
Note: the individual Columns can be expanded-contracted by dragging their Header borders.
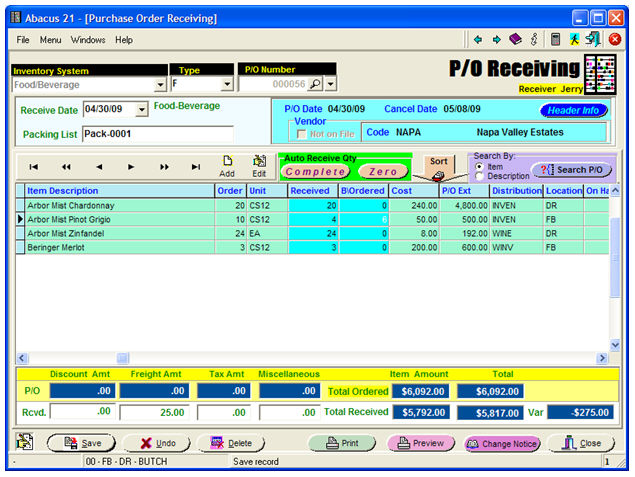
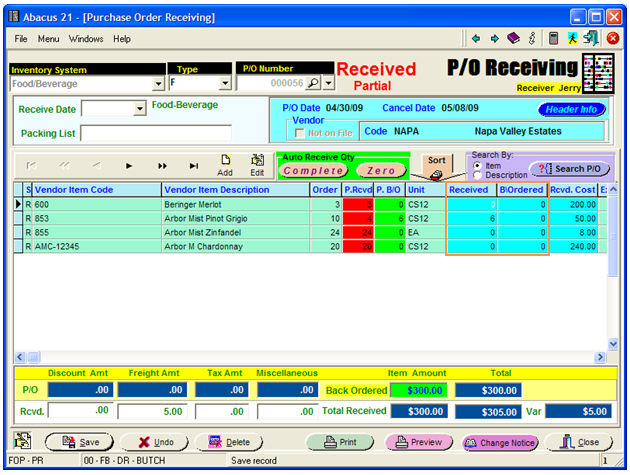
Now, changing the 1st Line-Items 'Complete' defaulted Quanity from 10 to 4:
Note (in this instance, since the P/O was set to default to Fill-or-Kill) that the BackOrder Quantity defaulted to 0:
... but, can be changed to whatever... in this example, '6' to await the balance of the partially-received amount:
... yielding the resultant modification:
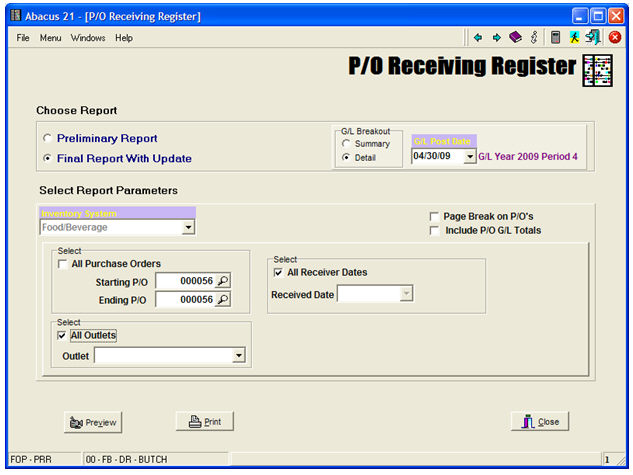
The Receiving Entry becomes 'official' when the P/O Receiving Register is run.
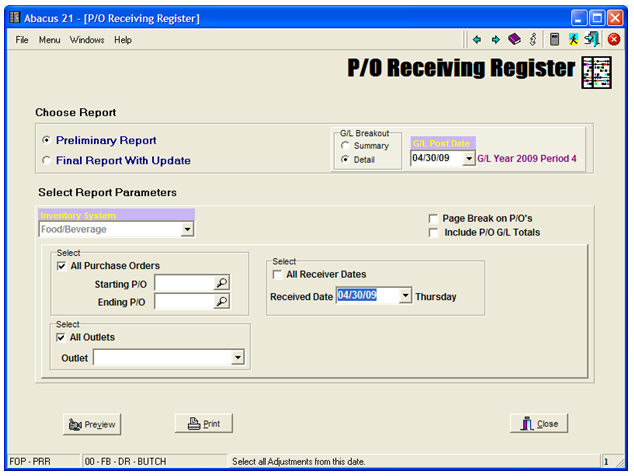
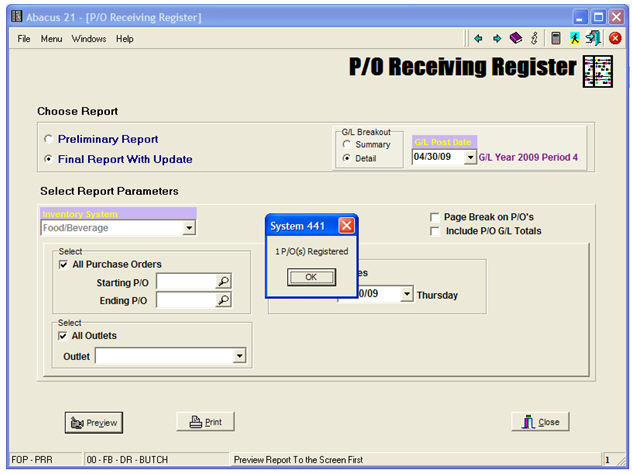
Choose Report -
Select either 'Preliminary Report' or 'Final Report with Update'.
Select G/L Breakout to be either 'Summary' or 'Detail'.
Select the G/L Posting Date (defaults to today).
Select Report Parameters -
Select the appropriate Inventory System.
Select Checkbox for 'All Purchase Orders' or Enter Starting & Ending Purchase Order Numbers.
Select Checkbox for 'All Receiver Dates' or Enter a specific 'Received Date'.
Select Checkbox for 'All Outlets' or Enter a specific 'Outlet'.
Page Break on P/O's - Select this Checkbox if you want a separate Page for each P/O (Receiving).
Include P/O General Ledger Totals - Select this Checkbox if you want to have G/L-Account Totals for each Receiver.
Controls -
Preview to the Screen
Print to a Printer
Close
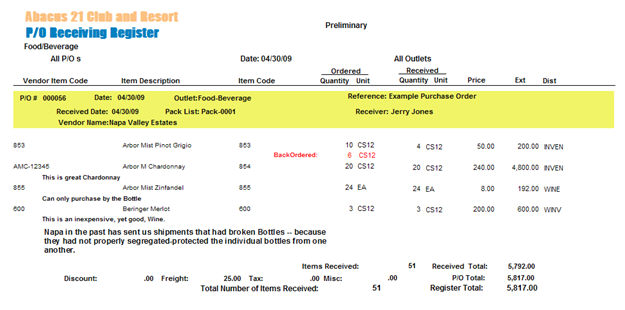
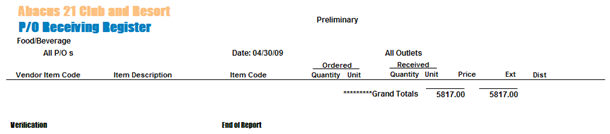
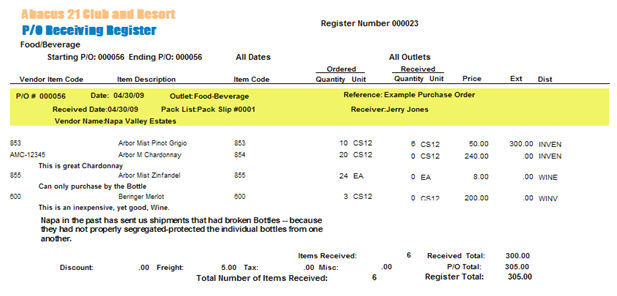
The following is an example of a Preliminary P/O Receiving Register:
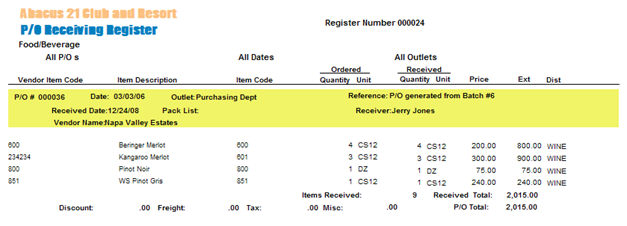
The following is an example of a Final P/O Register:

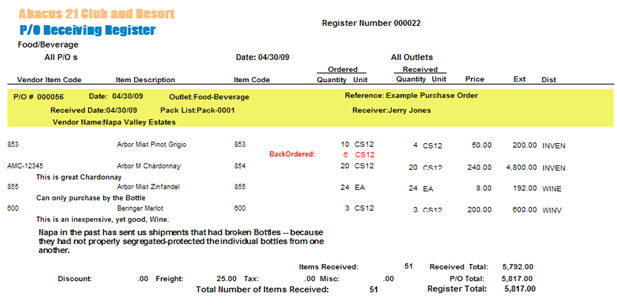
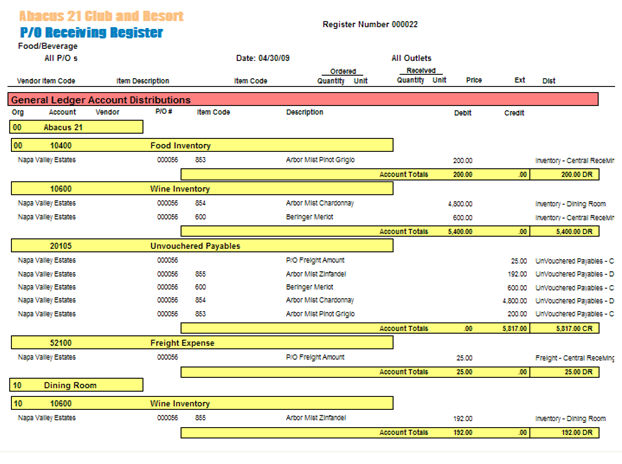

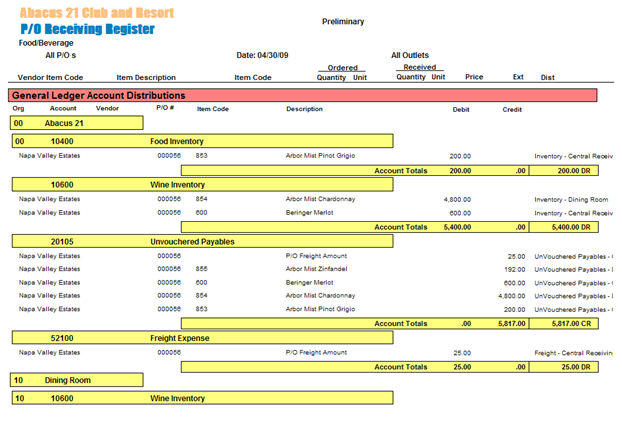
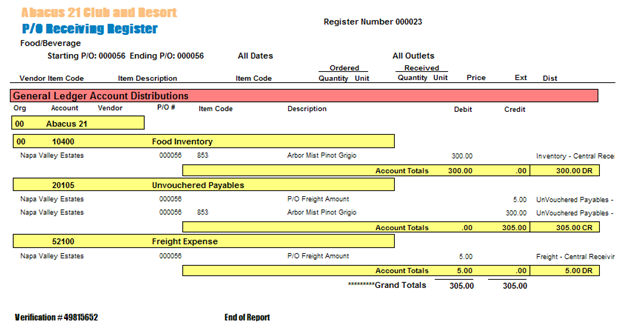
Below is an example of a P/O Receiving Register that has G/L-Information attached to it:
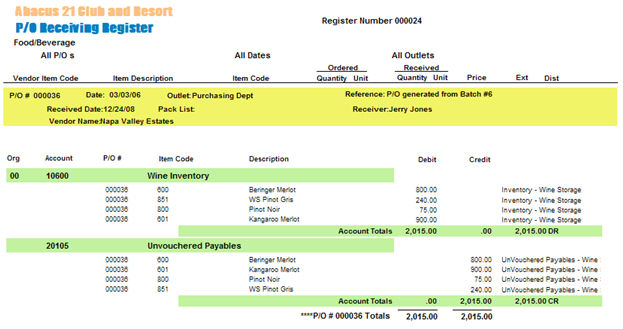
Results of the P/O-Receiving -
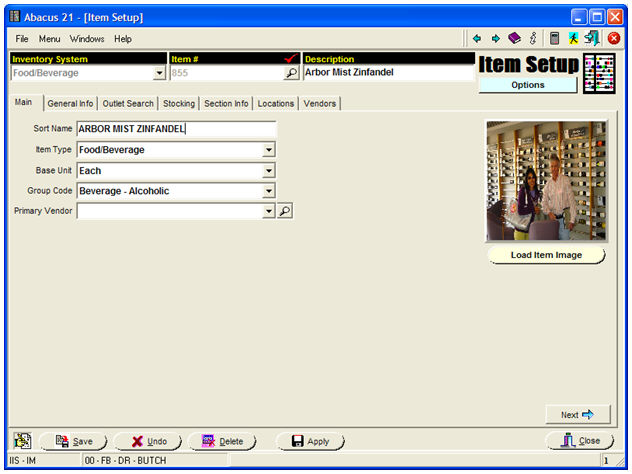
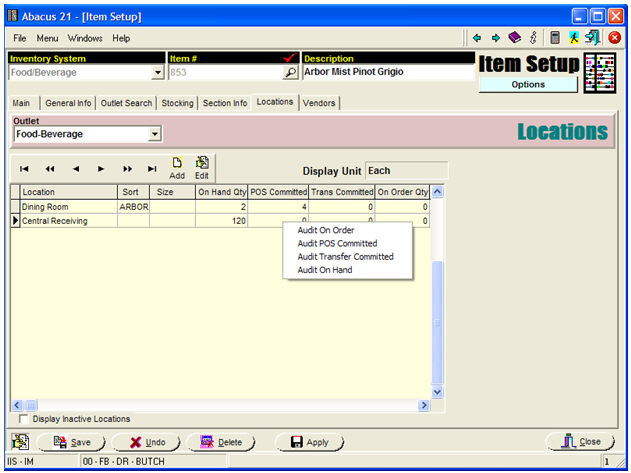
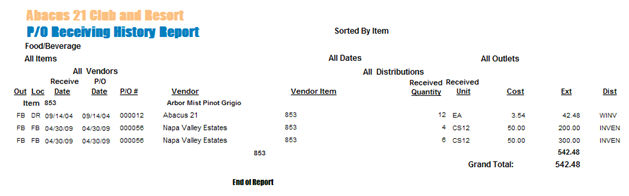
Examining one of the Items (Item-Code 855, Arbor Mist Zinfandel -- which was one of the Received Items on P/O #F-000056) in Item Maintenance:
Selecting the 'Locations' tab, and right-clicking on any specific Location (like the Dining Room) will give you a dropdown Menu:
Audit On-Order (show all the Quantities that are currently On-Order)
Audit POS Committed (show the Quantities sold in POS but not yet Registered-Posted)
Audit Transfer Committed (show the Quantities of Requisitions & Adjustments that have been entered but not yet Registered-Posted)
Audit On-Hand (show the complete derivation of the Item's On-Hand balance at this Location... from the inception of the Item until now)
In essence, the complete history of the Item is available...
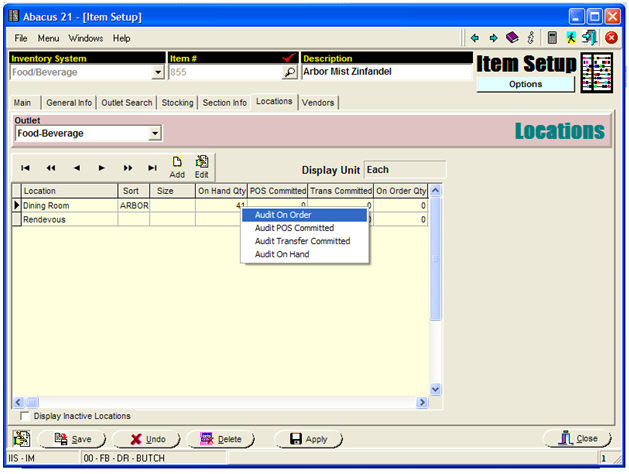
Since we currently interested in the effect of the Received P/O, we select 'Audit On-Order':
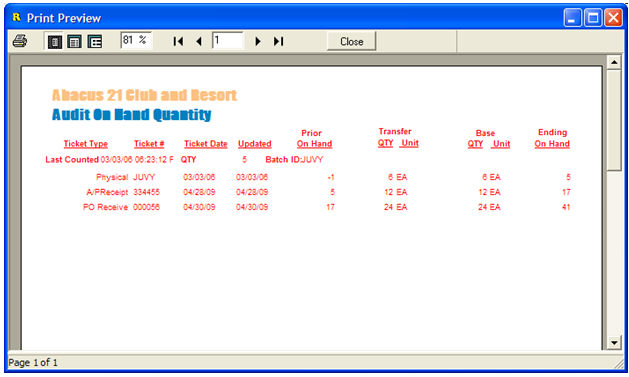
... and notice that P/O 000056 was received on 04/30/09 (at which time the prevailing (Prior) Quantity-On-Hand was 17)... and we received 24-Eaches... raising the Ending-On-Hand to 41.
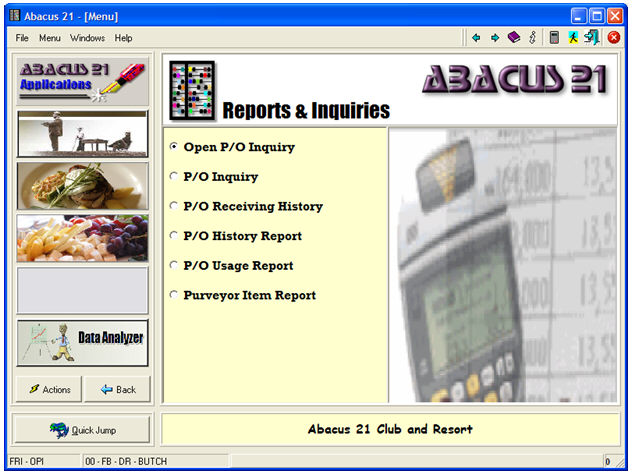
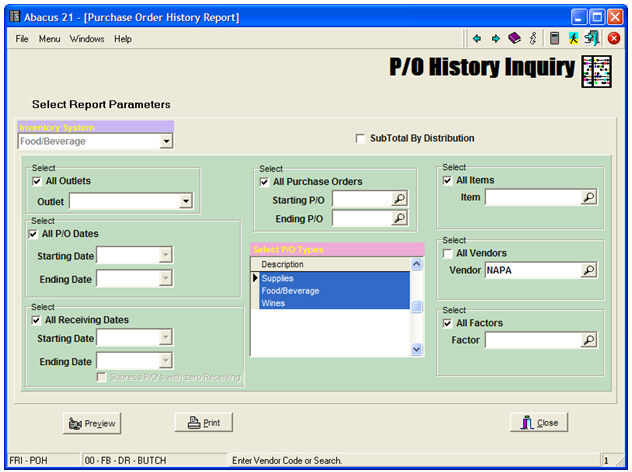
Purchasing Reports & Inquiries -
The following types of Inquiries and Reports are available:
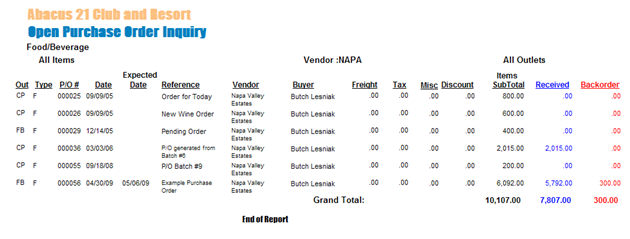
Let's first find any Open Purchase Orders:
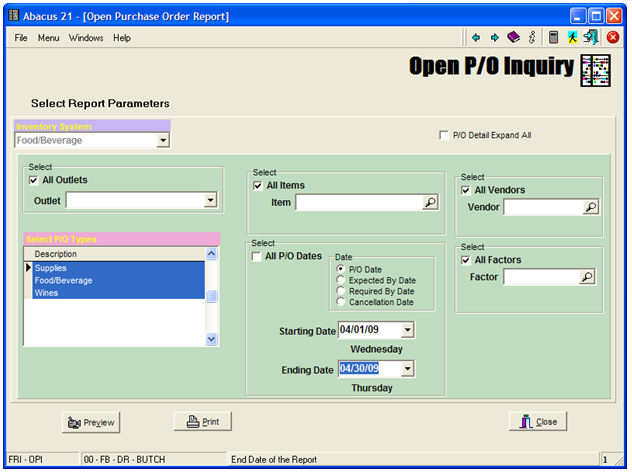
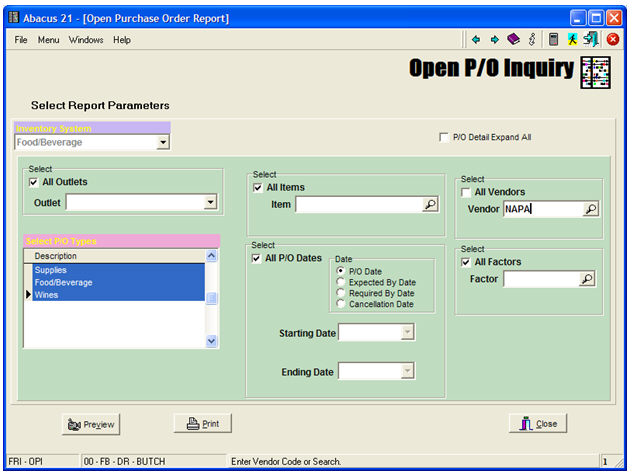
Select Report Parameters -
Select the appropriate Inventory System.
Select 'All Outlets'... or a specific Outlet.
Select one or more 'P/O Types'.
Select 'All Items' or a specific Item.
Select 'All Vendors' or a specific Vendor.
Select 'All Factors' or a specific Factor.
Select 'All P/O Dates'... or a Starting-Ending Range of Dates by:
P/O Date
Expected-By Date
Required-By Date
Cancellation Date
Control Buttons -
Preview to the Screen
Print to a Printer
Close the Application
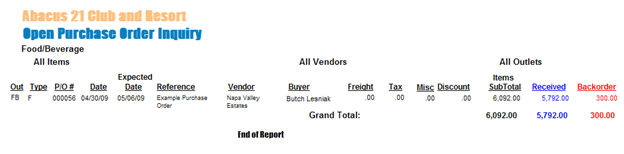
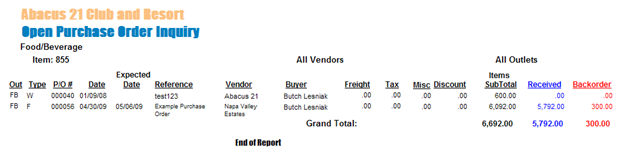
For example... finding our Partial-filled (still Open for the Date Range 04/01/09 thru 04/30/09) Purchase Order F-000056:
Or... searching for any Open P/O involving Item 855 (the Arbor Mist Zinfandel):
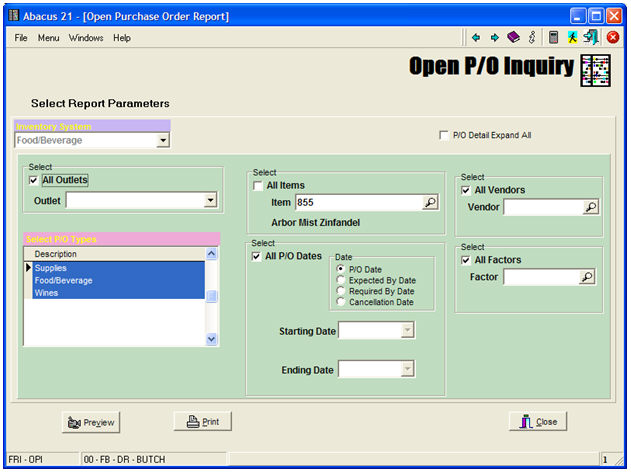
... we find two Purchase Orders:
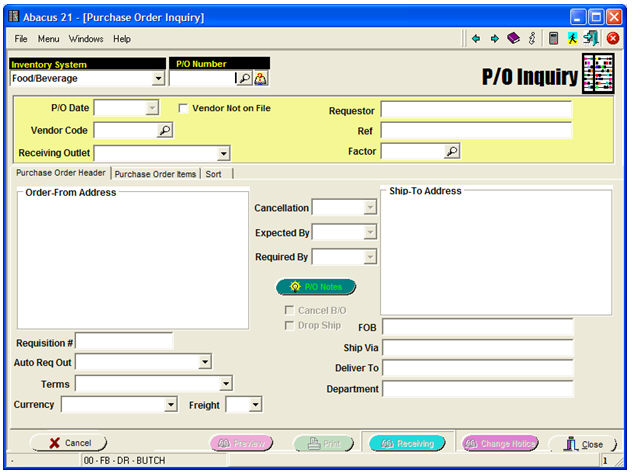
The P/O Inquiry Screen looks like this:
And, exercising the Search gives:
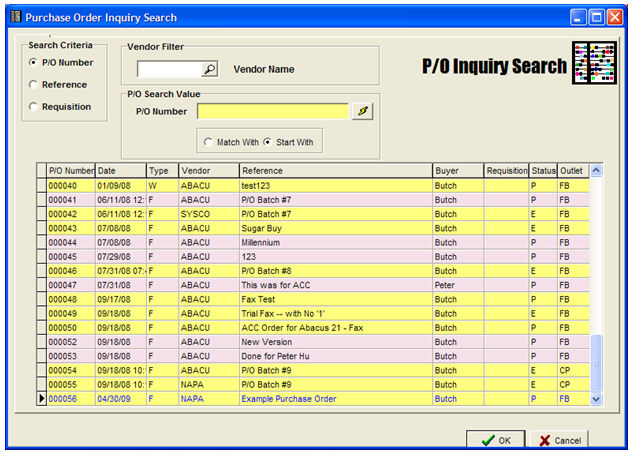
Note the Status Column:
E = Entered (but not Printed)
P - Printed
... and trying to isolate all Open Purchase Orders from a particular Vendor (Napa):
... yields the following result:
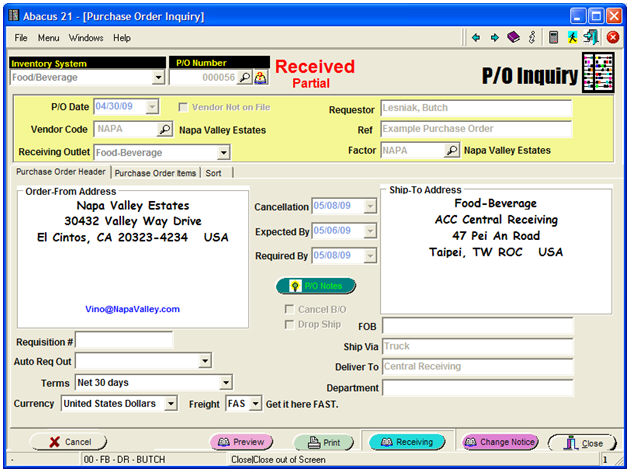
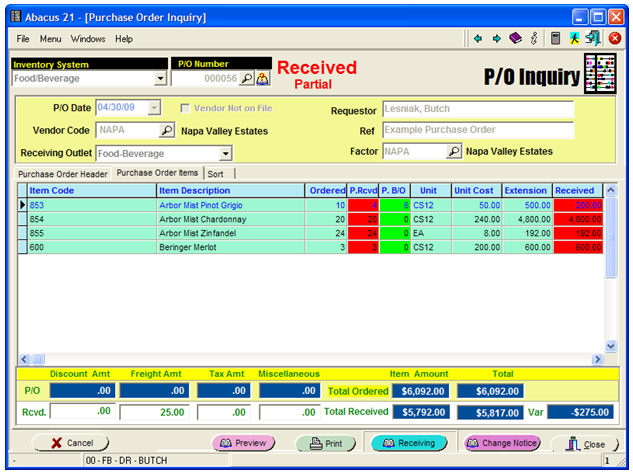
Calling up a Purchase Order (our Example F-000056) that has already experienced some Partial-Receipts:
Notice the red 'Received Partial' banner at the time... and the red-highlighted column for Partial-Received Quantities in the Grid... as well as the green-highlighted Partial Quantity BackOrdered Column.
For each line-item on the Grid, you are provided:
The Original Order Quantity
The (total) Quantity that has been (partially) Received to date
A spot to enter the whatever portion of the remaining balance of the Item's Order is being received with this current Shipment.
Again, you have the 'Complete' and 'Zero' Buttons to assist in the fill-in.
Notice that this entry screen has properly recognized that their is a BackOrder of 6 remaining on the Item-853 (Arbor Mist Pinot Grigio) -- since a Quantity of 4 was previously-received against the original Order Quantity of 10.
Hitting the 'Complete' Button defaults in all the pending BackOrder Quantities as having been Received (highlighted with orange borders):
Giving the following Receiving Copy:
Note that the changes are highlighted in Red.
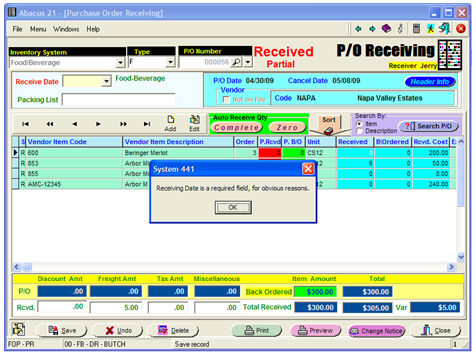
The above is a notification that the Receiving Date is a Required field.
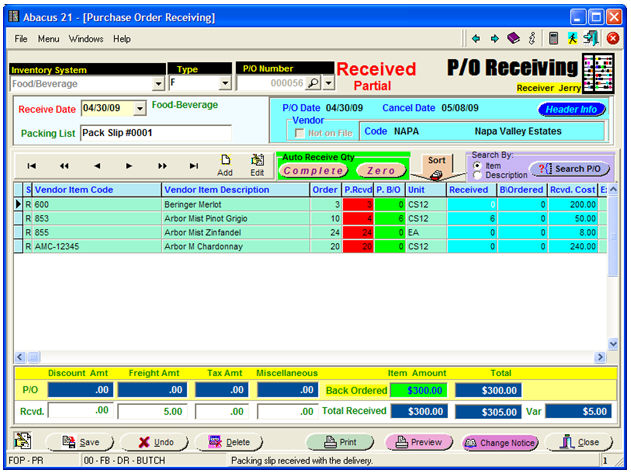
Fixing this problem, we get the following Receiving Entry:
... and the following Register:
Calling up the P/O:
... and showing the Line-Item detail, reveals the following:

Now, checking back on the Item Maintenance, for Item 853 (Arbor Mist Pinot Grigio) in Item Maintenance:
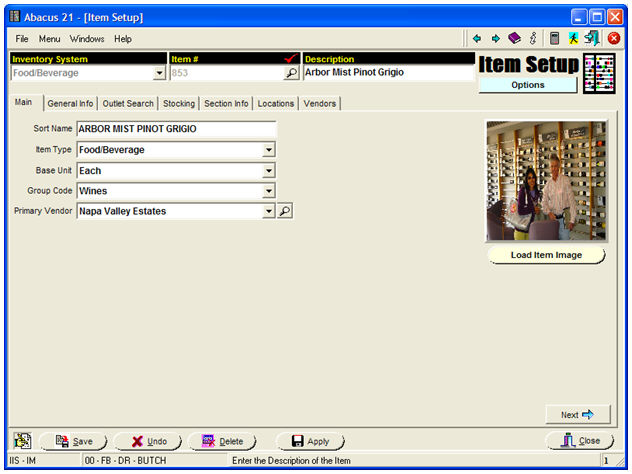
Going to the 'Locations' tab, and right-clicking on Central Receiving:
We then see acknowledgement of the (balance of the) Partial-Shipment having been received:

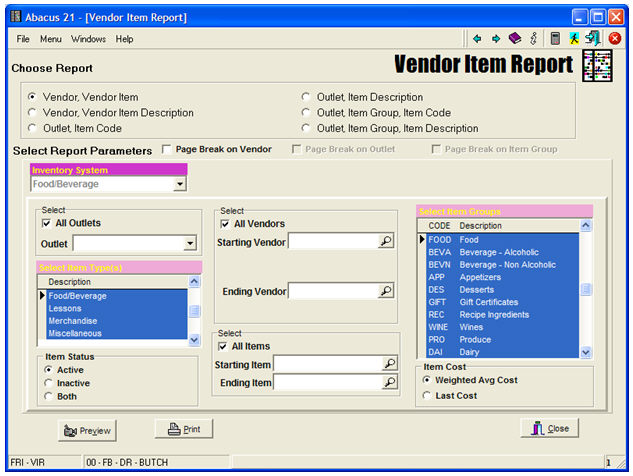
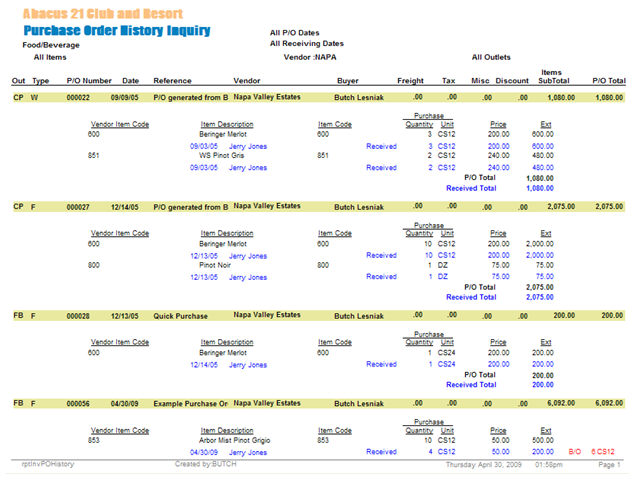
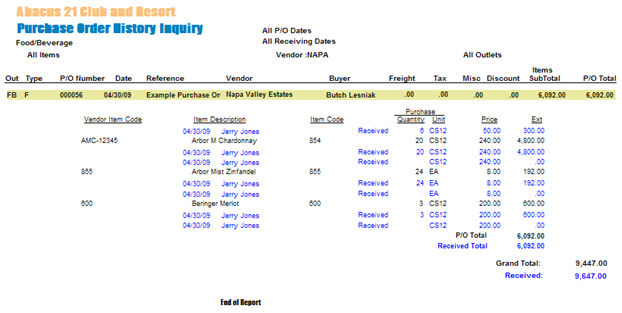
This Menu Option allows you to examine the Purchasing History from a number of perspectives.
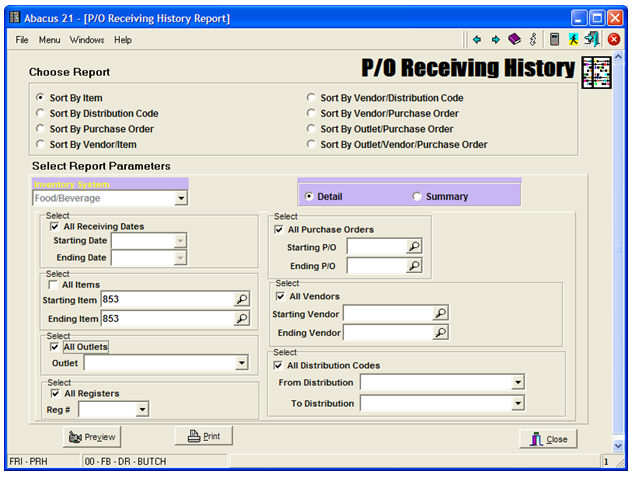
Choose Report (Sort) - by a variety of criteria.
Select Report Parameters -
Select the appropriate Inventory System.
Select 'Detail' or 'Summary' mode.
Select 'All Receiving Dates' or a Range of them.
Select 'All Purchase Orders' or a Range of P/O-Numbers.
Select 'All Items' or a Range of them.
Select 'All Vendors' or a Range of them.
Select 'All Outlets' or a specific one.
Select 'All Distribution Codes' or a Range of them.
Select 'All P/O Receiving Registers' or a specific one.
Control Buttons -
Preview to the Screen
Print to a Printer
Close the Application.
Or... search for a particular Vendor (Napa):
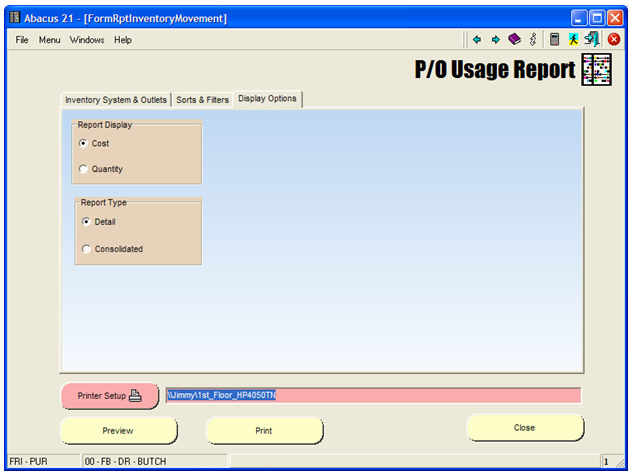
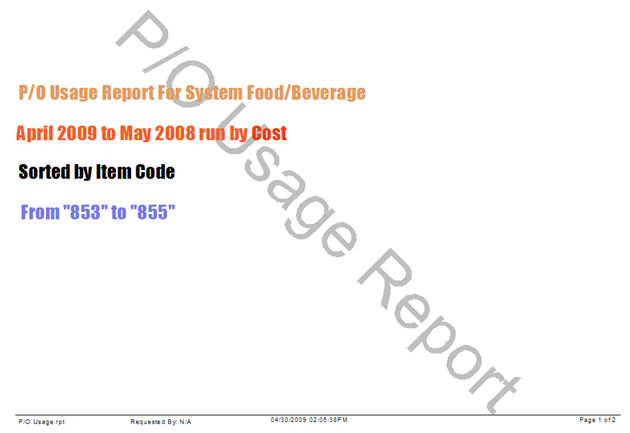
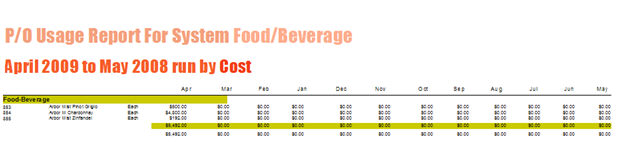
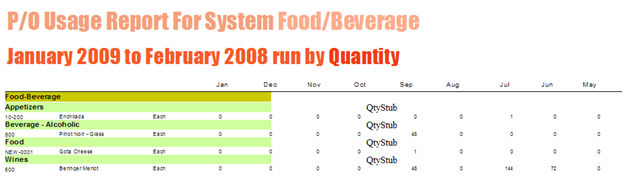
The P/O Usage Report shows Purchasing Activity over a 12-Month span.
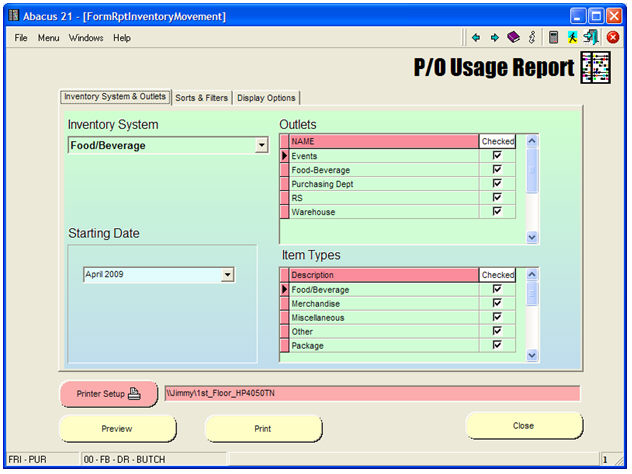
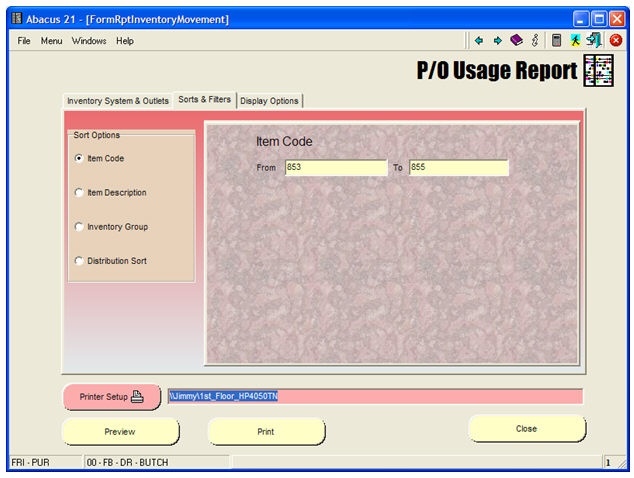
And... and the resultant P/O Usage Report:
And, below, run by Group:
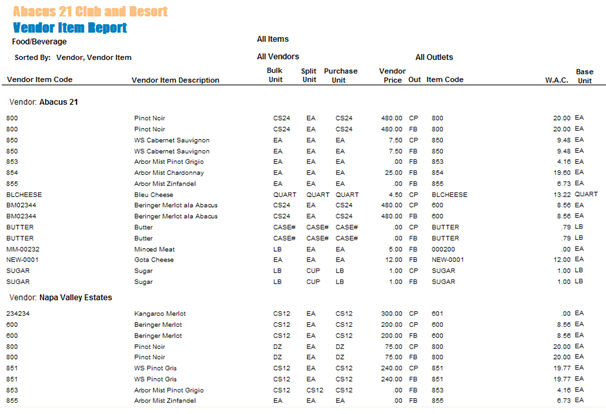
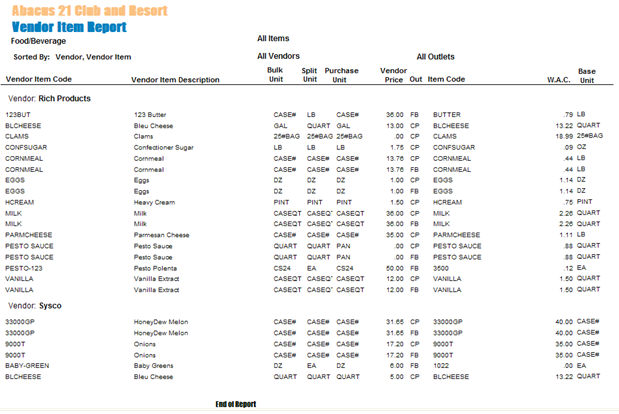
Purveyor-Vendor Item Report -